


2. Equipment and skills for digitising in the field
© Patrick Sutherland, CC BY 4.0 https://doi.org/10.11647/OBP.0138.02
This chapter describes the technical equipment and essential skills required for copying documentary material in the field. The main focus is upon digitisation using cameras, although scanners are touched upon at the end of the chapter. The chapter begins by introducing the digital camera from first principles, outlining key technical aspects such as exposure, aperture, shutter speed and choice of lens. It then considers other essential equipment, including copy stands and tripods, relating these to a discussion of lighting and flash — a key consideration for document copying. Throughout, the emphasis is on how to successfully copy material to archival standards, digitising it for long-term preservation, even in remote, challenging and unusual circumstances.
When specifying your project equipment, you will have a basic choice between a digital single lens reflex camera (DSLR) and a flatbed scanner for copying material to a professional standard. For very specific materials you may also need to consider a film scanner or overhead scanner, but these go beyond the scope of most EAP projects and neither is discussed further within this book. Both cameras and scanners have particular advantages and disadvantages. It is therefore essential to get a clear sense of the nature of the material you wish to copy, particularly its physical dimensions and character, together with the environment in which the copying will take place, before you make this choice and purchase equipment.
The importance of preparation
Whatever equipment you choose to purchase, it is absolutely essential that you get to know your copy set-up and are fully conversant with the technology prior to any field trip. This is true whether you are using a scanner or a digital camera with lenses, and whether you are using available light, supplementary lighting or flash. With camera technology and with flash, this learning process may take several days, especially if you have not used a sophisticated digital camera before. You also need to be fully conversant with your data management system.
Digital cameras and scanners are complex technologies and operating processes need to be learned well in advance of undertaking digitisation. This is especially true for projects in remote locations.
Figure 10. EAP644, Camera and scanner used in parallel, Beirut. This project used both a camera with copy stand, and a scanner, to digitise nineteenth-century photographs. Photo © Yasmine Chemali, CC BY 4.0.
Camera or scanner?
Advantages of scanners
• Flatbed scanners keep simple documents completely flat and illuminate them internally. They therefore avoid the problems of aligning documents and the potential distortion from using wide-angle lenses with cameras. Used correctly, the scanner produces images that are accurate facsimiles of the originals.
• Scanners can save files direct to TIFF format and can easily be set up to save files using the final EAP file names, thereby reducing the post-production workload.
Disadvantages of scanners
• Scanners have limitations on the maximum size of document they can copy.
• Scanners that will work with documents larger than A3 (29.7 x 42.0cm) are extremely expensive, very large and are not portable.
• Scanners are only appropriate in situations with a reliable electricity supply.
• Using scanners involves handling documents, as well as contact between the page and scanning platen. This is not always appropriate from a conservation standpoint, above all with bound materials.
Advantages of digital cameras
• Cameras are much faster to use than scanners when copying large numbers of documents of a similar size (pages of an unbound book or photographs of a standard size, for example).
• Cameras run off rechargeable batteries and are not directly dependent on electricity or connection to a computer, so are better suited to working in situations where electricity supplies are unpredictable. (Batteries need to be recharged, however, so some access to an electricity supply is essential.)
Disadvantages of digital cameras
• Digital cameras are significantly more complex to use than most scanners, so the learning curve is much steeper.
• Many cameras do not record in TIFF format, so files need to be exported from RAW to TIFF. Files will also need to be renamed during this process (see Chapter 6).
• Cameras have to be set up carefully to ensure that the camera back is parallel to the copying surface, so that the documents being copied are squared up and not distorted in the process. This is particularly true when using wide-angle lenses.
What camera brand should I buy?
Canon and Nikon are very well established camera brands, being the default choice of most professional photographers. They have a wide range of camera bodies, lenses, accessories and flashgun systems, and the cameras they produce in the semi-professional range are rugged and reliable and therefore very suitable for conditions in the field. Cheaper cameras in their ranges, though capable of producing excellent images, are perhaps less likely to survive the rigours of fieldwork. Their moisture and dust seals are less effective and their shutters will not last so long.
The Digital SLR camera: a general introduction
Digital cameras are devices which capture and store images in a digital format. They record the light passing through a lens onto a light-sensitive electronic sensor that captures a permanent image. There is a huge variety of different kinds of digital camera. They are now commonly built into phones, computers, tablets and many other devices. However, the Digital Single Lens Reflex is the ideal camera for copying because of the level of control it offers over framing, focus and exposure.
The Endangered Archive Programme only recommends the use of DSLR cameras and does not recommend the use of other kinds of camera.1 As well as offering high image quality, the design of a DSLR camera allows the operator to see directly through the lens of the camera, rather than through a separate viewfinder. (This is true whether you are actually looking through the camera viewfinder or using the rear LCD screen.) This means that the framing and focussing of the camera is extremely accurate, which is especially important when copying close up. Equally importantly, DSLRs allow for very precise control of exposure when using available light or flash. They allow the photographer to view images almost immediately in order to check the quality of reproduction, the focus and exposure, and to assess the arrangement of objects within the frame and check for any problems like surface reflection. DSLRs can also be set up for tethered shooting, which entails connecting a digital camera to a computer. As described below, special tethering software displays the image onto the computer screen and can save the image files directly onto the computer hard drive and/or the camera’s memory card. Finally, DSLRs have interchangeable lenses.
The term full frame is used by photographers as shorthand for an image sensor format which is the same size as 35mm format film (36 x 24mm). Historically, 35mm was considered a small film format compared with medium format or large format cameras.
Advanced Photo System (APS) sensor cameras have much smaller sensors (approximately 22.5 x 15mm, but varying between manufacturers). This means a full-frame sensor has over 2.25 times the surface area of an APS-C sensor.
• Cheaper, slightly smaller and slightly lighter than full-frame cameras of similar build quality and specification.
• Good APS cameras produce high quality image files perfectly acceptable for EAP projects.
• The focal lengths of all lenses are effectively magnified by 1.5–1.6 times, meaning that a standard 50mm lens becomes a short telephoto lens. This can cause problems for projects copying larger items. (However, a good close-focussing 35–40mm fixed focal length lens could replace a 50mm macro for most copying of items larger than 12 x 18cm.)
Advantages of full-frame cameras
• Higher quality resulting from the larger sensor size.
• No magnification of lens focal length.
Disadvantages of full-frame cameras
• More expensive than APS cameras of similar quality. They also tend to be larger and heavier. Cheaper full-framed cameras offer excellent image quality but are less robust than more expensive cameras.
For more on recommended cameras, see Digital Appendix 4 at https://doi.org/10.11647/OBP.0138.11
DSLRs: principles and settings
Exposure
The exposure is a measure of the amount of light that is transmitted through the camera lens to the sensor. This is the light reflected from the surfaces of the objects framed by the camera.
In any given lighting situation, correct exposure is achieved through setting a combination of the aperture and shutter speed at a particular ISO setting. These settings are recorded in the metadata attached to each digital file. In simple terms, the ISO setting represents the sensitivity of the camera to light. Therefore, and as discussed below, the larger the ISO number the more sensitive it is. Changing any of these three variables of aperture, shutter speed and ISO changes the exposure. (The exception is when working with flash, where in many situations changing the shutter speed has little or no effect on exposure.)
The aperture
Camera lenses contain an aperture, which is essentially a hole through which light can travel. The diameter of this aperture is adjustable in much the same way that the iris of an eye adjusts the size of the pupil. On most DSLRs the aperture is adjusted on the camera, rather than on the lens.
The aperture controls the amount of light that passes through the lens, thereby affecting the sensor’s exposure to light. Aperture settings are expressed as f-numbers. Smaller apertures have larger f-numbers (f16 for example), whilst larger apertures have smaller f-numbers (e.g. f2.8). On older lenses the aperture was controlled by a ring engraved with numbers in the following order: f1.4, f2, f2.8, f4, f5.6, f8, f11, f16, f22. (In this example, the maximum aperture of this particular lens is f1.4 and the minimum is f22: maximum and minimum apertures vary between different kinds of lenses.) The difference between each adjacent aperture number on this list is known by photographers as a ‘stop’. ‘Opening up’ the aperture by one stop, from say f5.6 to f4, doubles the amount of light that passes through the lens. In contrast, ‘closing down’ the aperture by one stop, for example from f8 to f11, halves the amount of light that passes through the lens. On DSLRs you can adjust the aperture in increments of a third of a stop. Because of the way that f-numbers are calculated, an aperture setting of f8 will yield the same exposure with different lenses, providing that other parameters are identical.
The aperture also affects the depth of field of the image: as discussed below, smaller aperture settings (i.e. higher f-numbers) have a greater depth of field. As a general rule of thumb, you should be copying with a minimum aperture setting of f8, so settings of f11 or f16 are also fine. Settings beyond these, such as f22, are not as sharp for most lenses. These settings will give you better depth of field than using the lens wide open and therefore tends to keep the image sharper from corner to corner of the frame. It also results in sharper images of items that are not completely flat — for example, a thick, tightly bound book, where the gutter may be a little closer to the camera than the outer edge of the page.
Regardless of the aperture you have chosen, you should always examine the results to check sharpness by zooming into the image displayed on the rear LCD screen or by checking on a computer screen. Check the sharpness of the image in the corners as well as in the centre.
The shutter
The shutter is a curtain-like device in front of the camera sensor, which remains closed until a photograph is taken. When the camera shutter is fired, the shutter opens for a determined period of time (the shutter speed), exposing the sensor to light passing through the lens.
The shutter speed controls the time that the sensor is exposed to the light that passes through the lens. Traditionally, shutter speeds were set at speeds of 1 second (sec), 1/2 sec, 1/4sec, 1/8 sec, 1/15 sec, 1/30 sec, 1/60 sec, 1/125 sec, 1/250 sec, and 1/500 sec, but modern shutters now also have much faster and slower speeds. As in the example of apertures, the difference between each of these speeds is one ‘stop’. Changing the shutter speed from, say, 1/30 to 1/60, reduces the time that the shutter is open and the sensor is exposed to light by a factor of two, halving the exposure. Changing from 1/4 sec to 1/2 sec increases the time that the shutter is open and the sensor is exposed to light, doubling the exposure. (On DSLRs you can adjust the shutter speed in increments of one third of a stop.)
Shutter speed also affects the sharpness of the image. Fast shutter speeds are primarily important to freeze movement and to reduce the impact of camera shake. However, it is essential to use either a copy stand or a tripod for professional copying of still documents. Consequently, provided there are no other sources of vibration (passing traffic, vibrating equipment in the room or on the table such as fans), slow shutter speeds are not a problem and should not affect sharpness. As described below, to reduce the possibility of vibrations even further we recommend using a remote release or tethered shooting to trigger the shutter.
ISO settings
ISO stands for International Standards Organisation. In photography, it refers to a standardised measurement of how sensitive the camera sensor is to light. Along with the aperture and shutter speed settings, the ISO setting plays a very specific role in exposure. On lower ISO settings, the sensor is less sensitive to light; on higher ISO settings, the sensor is more sensitive to light. Importantly, the lower the ISO setting, the higher the quality of the images created on the sensor. Higher ISO settings are subject to increasing levels of digital noise, which affects the image quality. This ‘noise’ equates to the graininess of films using high ASA (film speed) settings — though digital noise seems less aesthetically acceptable than graininess.
As a good general rule, you should use an ISO setting of 100 or 200. Do not use an ISO setting above 400.
Setting the exposure
In any given lighting condition at a particular ISO setting, correct exposure is achieved by the combination of aperture and shutter speed. This varies the amount of light transmitted onto the sensor: the correct combination of aperture and shutter speed allows sufficient light onto the sensor to achieve correct exposure.
For example, if you are copying documents using available light (i.e. not flash) at ISO 100 and correct exposure is achieved at a setting of 1/60 sec at f5.6, then the same overall exposure will be achieved by combinations of 1/125 at f4, 1/250 at f2.8 or 1/500 at f2, or alternatively 1/30 at f8, 1/15 at f11 or 1/8 at f16. In such situations, shutter speed and aperture setting have a reciprocal relationship: if you change one you have to change the other to maintain identical exposure. If you are photographing a completely flat object using a copy stand so there is no subject movement, then the images produced at each of these settings should look identical.
Exposure modes
Semi-professional digital SLRs offer a range of exposure modes, commonly selected via a dial on the top of the camera:
- Aperture Priority (the letter A on a Nikon, Av on a Canon): in this automated exposure mode, the photographer chooses the ISO setting and the aperture, and the camera computes the shutter speed needed to give correct exposure.
- Manual (the letter M on both Nikon and Canon): in manual exposure mode, the photographer chooses the ISO setting as well as the shutter speed and the aperture needed to achieve correct exposure.
- Shutter Speed Priority (the letter S on a Nikon, Tv on a Canon): in this automated exposure mode, the photographer chooses the ISO setting and the shutter speed, and the camera computes the aperture needed to give correct exposure.
- Programme Auto (the letter P on both Nikon and Canon): in this automated exposure mode, the camera chooses the ISO setting, the shutter speed and the aperture needed to give correct exposure.
- Additionally, some cameras have other exposure settings and also allow for customisable settings. We do not recommend any for copying, and they should be ignored.
The development of digital camera technology has been concentrated on increasing automation, and auto modes on cameras are now extremely accurate. Most DSLRs can operate almost like point-and-shoot cameras and give remarkably good results in terms of focus and exposure. However, digital cameras cannot make the very specific kind of decisions that are needed when copying to professional standards. For that reason, and for all but the most competent photographers, we recommend using Aperture Priority exposure, i.e. setting the aperture and ISO first, then letting the camera work out the exposure according to the lighting conditions, whether available light or flash. Alternatively, but only if you are experienced and technically proficient, you can work using the manual exposure setting, in which case you should set the aperture and ISO first then work out the exposure and shutter speed setting yourself, according to the lighting conditions.
Setting up the camera
Settings
• Set the camera to shoot in RAW format (NOT sRAW, mRAW or JPEG).
• Set the colour space to sRGB.
• Set picture style to Neutral.
• Switch on the highlight alert feature to indicate any over-exposed areas.
• Switch on the electronic grid to aid composition and squaring up the image (or replace the focussing screen with a grid screen).
Using the rear LCD screen
The LCD screen on the back of the camera can display all the key information (the selected shutter speed, aperture, ISO setting, choice of RAW settings, choice of manual or auto exposure settings, picture style, white balance, exposure compensation, battery levels, number of frames remaining etc.). Most of this information is also visible through the viewfinder or on the top LCD screen but is much more easily read on the main LCD screen. Many of these key settings can also be easily and quickly adjusted here rather than accessing key settings through other menus or dials.
Get used to checking the displayed settings prior to each shooting session and double-checking regularly to make certain no settings have been accidentally changed. Some cameras allow you to lock the settings and thus prevent unintentional changes.
Using the Aperture Priority mode
Fix the camera on a tripod or copy stand. Put the camera into Aperture Priority mode (the A setting on Nikon, the Av setting on Canon). Set the ISO to 100 and the aperture to f8 or smaller (f11 or f16). Carefully arrange the material within the frame, including the colour checker/measure. Focus the lens, adjusting the height of the camera up the copy stand column if necessary. Shoot the image using a remote release. The camera will automatically compute the correct shutter speed and apply it. (N.B. The settings will be displayed in the camera viewfinder and/or the LCD rear screen.) Next, examine the results:
- Check the quality of reproduction: confirm that the material being copied is in focus and correctly exposed.
- Check for sharpness from corner to corner. If the image is generally in focus but one side falls out of focus, check that the camera back is parallel to the surface of the material being copied and that the material is flat. If the corners are falling out of focus, then try shooting at a smaller aperture.
- Check for problems like surface reflection and adjust the lighting if necessary.
- Check the evenness of the lighting across the frame and any fall-off in the corners and adjust the lighting if necessary.
- Check for any colour cast,2 a tint caused by mixed lighting, most visible in white areas, and adjust the lighting if necessary.
- Double check the arrangement of objects within the frame.
- Reshoot if required.
In order to check the quality of the image, you should ideally view the image on a computer screen, but if necessary use the camera’s rear LCD screen to view the histogram; also to zoom in on the images to check focus, overall sharpness, exposure and colour balance.
Aperture Priority mode gives remarkably good results under most conditions. However, the camera will not always give perfect exposure in automatic settings. The built-in light meter in a camera assumes that the subject matter averages out as a mid-tone, and in most situations this works well, but when faced with subjects that are either much paler or darker in tone, images may be incorrectly exposed.
Incorrect exposure in the Aperture Priority mode can easily be modified using the exposure compensation control. Shift the exposure towards the + sign to make the image lighter and towards the − sign to make the image darker. Exposure compensation settings will be displayed in the viewfinder and on the rear LCD panel. When copying a large collection of objects of a similar tone — paper documents or book pages, for example — you may well find that you use a particular level of exposure compensation repeatedly, setting it as a default compensation for files that would otherwise be incorrectly exposed. But remember to check the exposure regularly during such long copying sessions and reset the exposure compensation to zero when you have finished digitising that group of materials.
Correct exposure gives full detail in both the shadow (darker) areas and the highlight (lighter) areas of the image. Underexposure leads to a loss of detail in the shadow areas of the image; overexposure leads to a loss of detail in the highlight areas of the image.
It is vital that you check your images thoroughly, and as soon as possible after you have taken them. Having to reshoot is an irritation, but it is far better done straight away — rather than having to retrieve a book from an archive, or worse, having to revisit a remote site.
Using the Manual exposure mode
Fix the camera on a tripod or copy stand. Put the camera into Manual exposure mode (the M setting on both Nikon and Canon cameras). Set the aperture to f8 or smaller and the ISO to 100. Carefully arrange the material within the frame including the colour chart/measure. Focus the lens, adjusting the height of the camera up the copy stand column if necessary. Adjust the shutter speed until the exposure indicator in the camera viewfinder is centred, indicating correct exposure. Shoot the photograph using a remote release. Then examine the results as per the Aperture Priority instructions above.
N.B. On manual settings, you cannot use the exposure compensation control. Instead, the exposure can easily be modified by changing the shutter speed, choosing a slower speed to make the image lighter and a faster speed to make the image darker.
What is depth of field?
When you focus the lens on something in front of a camera, you are establishing a plane of focus that is parallel to the back of the camera. Anything in that plane will also be in focus. The distance between the nearest and furthest objects in front of, or behind, this plane of focus that are also acceptably sharp is known as the depth of field. Depth of field increases as you make the aperture smaller and reduces as you make the aperture larger. So, all other things being equal, a lens has greater depth of field set at f11 than set at f4. Depth of field also reduces as you focus closer to the camera and increases as you focus further away, i.e. changing the separation between the camera and the object(s) being photographed.
The most important consideration when copying is to keep the subject matter as flat as possible, so that it is in focus from corner to corner. Shutting the aperture down will increase the depth of field slightly and therefore help to keep the edges of the material in focus.
Depth of field and close-up photography
As a good general rule, you should use an aperture of f8 or smaller.
If your material is very flat then a setting of f8 is probably fine, but if the material is three-dimensional and especially if it is also small, so that you are working very close, then a smaller aperture setting is recommended for maximum depth of field and image sharpness. In these situations, depth of field will be extremely shallow. To try to get the sharpest image, use the smallest aperture possible and focus very carefully. Try taking more than one exposure if necessary, focussing on different planes of the object; focus partway between the nearest and furthest surface of the object and select the sharpest frame when you can carefully compare them on the computer.
Use the LCD screen to double-check image sharpness on a regular basis.
Reading histograms
Digital cameras allow you to view the exposure given to any photograph in the form of a histogram. The histogram is a visual display in graph-like format of the image’s tonal range. It represents a scale from black to white and shows whether the frame is correctly exposed, underexposed (too dark) or overexposed (too light). It is a good idea to regularly check the histograms. You can view them on the camera’s rear LCD screen immediately after shooting an image.
The far left of the histogram represents pure black, and the far right represents pure white. The middle of the histogram represents mid-tones. If the subject matter consists primarily of mid-tones — a mid-brown document on a mid-grey background for example — then the histogram should display as a peak in the middle of the scale. If it is primarily composed of darker tones then the histogram will display as a peak on the left of the scale. If it is primarily composed of paler tones then the histogram will display as a peak on the right of the scale. If the histogram runs off the left or right of the scale then the histogram is ‘clipped’, meaning that part of the digital information is lost. If the image is underexposed then the histogram will run off the left-hand edge of the scale, indicating loss of detail in the shadow areas, the darker tones. If the image is overexposed then the histogram will run off the right-hand edge of the scale, indicating loss of detail in the highlight areas, the paler tones. This information from the histogram will reflect the qualities of the image displayed on the LCD screen (or on the computer screen). Ideally the exposure should be set so that the histogram does not run off either side of the scale.
Every histogram will look different, as some subjects are much lighter in tone and others much darker, and therefore correct exposure will reflect this variation. The height of the histogram at any point along the scale indicates the amount of data of that specific tone within the image. There is no such thing as an average looking histogram.
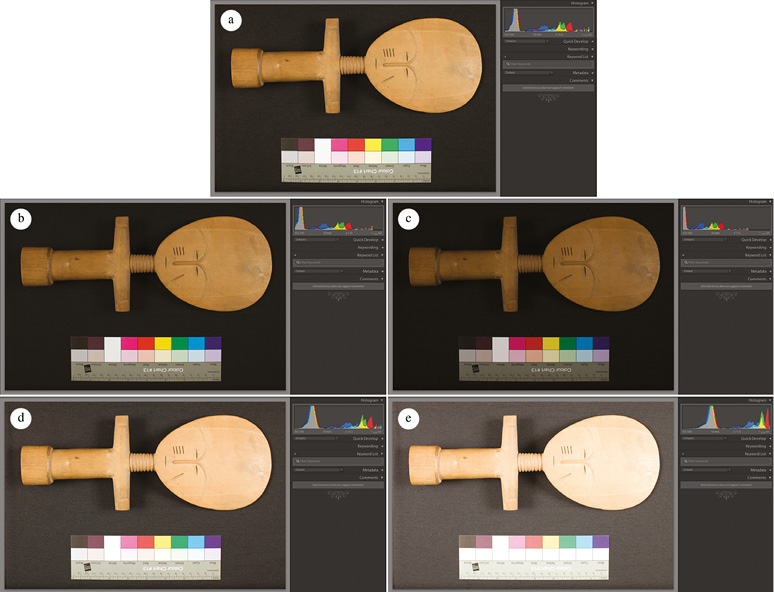
Figure 11. Example histograms. (a) Correct exposure with centred histogram. (b) Slight underexposure with non-centred histogram ranged left. (c) Underexposure with histogram clipping on the left and loss of shadow detail. (d) Slight overexposure with non-centred histogram ranged right. (e) Overexposure with histogram clipping on the right and loss of highlight detail. Photos © Patrick Sutherland, CC BY 4.0.
White balance and shooting in mixed lighting conditions
Sources of light, like the sun in the early morning or late evening, the sky on an overcast day, fluorescent tubes or household tungsten lights, emit light of a certain colour temperature, which is not the same as ‘white’ light. Our brains process the information that comes through our eyes, and compensate for variations in the colour temperature of the light around us. Consequently, we normally see the colours of objects ‘correctly’ in whatever light we view them. In other words, we see them without colour casts. But cameras have to be set up to remove the casts that would otherwise occur when shooting in different lighting conditions.
Digital cameras have an automatic white balance setting, which will adjust the colour temperature of the image to take into account the colour of the light falling on the material being copied. For most situations, setting auto white balance on the camera will result in a very close approximation to correct and natural looking colour: i.e. as if the light source illuminating the material is pure white light. More precise colour balancing can be done later if necessary, using the colour chart as a reference point. When shooting in RAW, the files can be easily adjusted after shooting as the RAW file is essentially unprocessed. Use the image processing software that comes with the camera or import the files into a programme like Adobe Lightroom.
However, this auto white balance (AWB) cannot work when light sources are mixed: for example, where the subject is being illuminated by both natural daylight and artificial light. In such mixed lighting, images will pick up colour casts that cannot be removed. To avoid this problem, don’t photograph in mixed lighting. Shoot either by available electric lights of one kind, or in daylight, but don’t mix the two. (Keep away from windows if you are shooting by domestic lighting; turn off the household lights if you are shooting by diffuse daylight or flash.) Different kinds of indoor lighting give different coloured light sources: do not mix fluorescent and other kinds of electric lighting. A coloured wall will reflect light of that colour and may cause a colour cast if it is too near to the copy set-up: move the camera away or cover the wall with a white sheet.
If you are shooting all your work under particular lighting conditions (e.g. fluorescent tubes) and find that the files have a colour cast even when using the AWB setting, then you can change the camera’s white balance control manually to a different setting. Cameras have a list of pre-set settings under the white balance menu, or you can adjust the colour temperature manually.
When shooting in daylight you should also avoid shooting in direct sunlight as this harsh lighting will produce very strong shadows. Shoot instead in the shade or perhaps inside a white tent. A white sheet will turn harsh sunlight into a soft and diffuse light source. Reflectors consisting of white sheets or sheets of white card can even out and soften harsh direct lighting.
Colour calibration using colour checkers
As well as preserving documentary information, the aim of EAP digitisation is also to record the physical artefact itself; this is the case whether it was designed with aesthetic qualities in mind (for example, a decorated scroll or illuminated manuscript) or was a working document whose original purpose was solely utilitarian.
Accurate reproduction of colour is therefore an important factor, and this is achieved by the inclusion of a greyscale and colour separation guide within each photograph (abbreviated to ‘colour checker’ in this book). This checker contains a number of colour squares, graduated across the colour spectrum, alongside graduated greyscale that spans light to dark tones. A size measurement scale is also present.
The presence of the checker in the photograph means that the original tonal values of the document can be correctly reproduced.3 Regardless of what lighting conditions you had to work with, and how your photograph appears on the camera LED screen or on different computer screens, it will always be possible to work out what the correct colour of your original document was. Developing software uses the information from the checker to enable these colours to be exactly replicated on properly calibrated screens, in exported files and in print-outs.
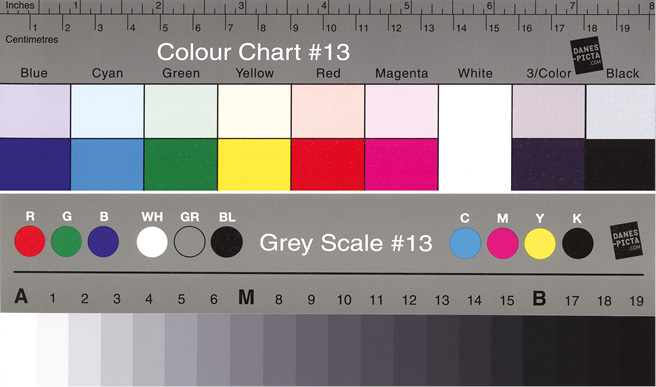
Figure 12. Greyscale and colour checker. Photo © Patrick Sutherland, CC BY 4.0.
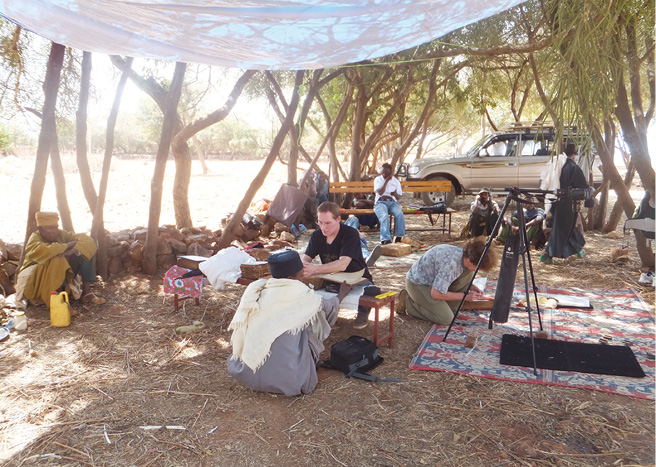
Figure 13. EAP704 Däbrä Abbay and EAP526 May Wäyni, Ethiopia. Digitising in the open air, inside a tent, to prevent harsh sunlight. Photo © Michael Gervers, CC BY 4.0.
RAW files generated by digital cameras store uncompressed image data exactly as it was captured by the camera, containing data from the sensor that has been minimally processed and with minimal loss of information. They need to be processed by a software programme, an image-editing RAW converter, before saving in a file format such as TIFF for storage or for printing. In the process of converting RAW files they can be adjusted significantly: for example, for white balance and exposure.
All camera brands use their own proprietary RAW format (.NEF files for Nikon and.CR2 files for Canon). RAW files are larger than JPEGs but significantly smaller than the TIFF files they generate.
TIFF files are commonly used in the printing industry and are much larger than their JPEG equivalents, because they are uncompressed or compressed using lossless compression.
JPEG files are a common photographic file format much smaller than those files saved as TIFF, because they have been compressed. This compression loses information, hence their unsuitability for archival or documentary purposes.
Shooting in RAW
DSLR cameras allow you to record images in RAW and/or JPEG formats. It is essential that you record in RAW at the largest file size. (Canon, for example, offers the choice of RAW, MRAW and SRAW formats: the latter two are processed and compressed versions and should be avoided.)
Rules
• Always shoot in RAW at the maximum size. Do NOT shoot only in JPEG format.
• Set the camera to Av or Manual.
• ISO 100–200 is the ideal. Do not exceed ISO 400.
Copying is a very particular kind of photography. It is important to choose appropriate lenses to correspond with the scale and nature of the material being copied. The ideal lens for most copying is a ‘standard’ lens and has a focal length of about 50mm (37mm on an APS camera). Nikon and Canon lenses such as these are quite small, very simple, often inexpensive, and very sharp. They also have a very natural and neutral perspective.
A 50mm standard lens (not a macro 50mm lens) on a full-frame DSLR camera will usually focus down to about 50cm and cover an area of about 18 x 27cm. Some standard lenses will focus even closer. All standard lenses can be used for general copying but some, unlike proper macro lenses, will cause noticeable distortion of the image at very close working distances.
If you are regularly dealing with material smaller than this then a macro lens is essential. These lenses are optically designed for close-up photography and mechanically designed to focus from infinity down to half life-size or even closer. They are also very sharp. It is important to note that the exposure changes as you focus very close up, so check the results regularly. If you are copying a lot of very small material then a longer than normal macro lens (e.g. 100mm) will allow you to photograph very close up but maintain a greater distance between the end of the lens and the subject, causing fewer problems with shadows falling onto the subject.
A basic rule of copying is that if there is too much space around the object then move the camera closer (rather than zooming in); if you want more space around the object then move the camera further away (rather than zooming out). If you have a zoom lens attached to the camera, then the tendency is always to zoom in and out rather than moving the camera. This is obviously quicker than moving the camera but it is very easy to slip into photographing larger documents with a very wide-angle setting. To avoid this tendency and to establish an efficient workflow, you could arrange the material being copied by size, photographing objects of a similar size together in batches so that the camera is moved less frequently. Wide-angle lenses or the wide-angle settings on a zoom lens should only be used for copying when there is no alternative as they are more likely to introduce distortion into the image. This is particularly true with cheaper zoom lenses.
However, there are situations when using a wide-angle lens or using a zoom on a wide-angle setting becomes unavoidable. In such circumstances you must take special care to make sure that the back of the camera is parallel to the surface being copied otherwise the image will show obvious distortion.
Try to use the zoom on a standard lens setting (approximately 50mm on a full-frame DSLR, approximately 37mm on an APS camera) and move the camera up and down to frame and reframe: try to avoid using the zoom facility and especially try to avoid using settings wider than 35mm (24mm on an APS camera).
If you do purchase a zoom lens, check that the lens does not shift focus or change focal length and zoom in when held pointing downwards. Some lenses do this even when brand new and this is infuriating when copying. Lenses with internal focussing mechanisms are less liable to exhibit this phenomenon of ‘lens creep’, though the focussing mechanism of well-used lenses becomes looser and more liable to this movement. (If the focus or focal length does shift you will need to tape up the lens barrel to prevent this.)
Wherever possible, use lenses made by the manufacturer of your camera. They are designed to function together seamlessly. However, some independent manufacturers like Sigma make very high quality lenses that are fully compatible with all functions of Nikon or Canon digital cameras.
Focussing in low light/manual focus
If you are working in low light levels and the camera finds accurate focussing difficult then switch the lens to manual focussing. Place a piece of paper that contains sharp graphic information (a newspaper headline, for example) on the baseboard and use that to fix the focus.
Framing and squaring up images
Many DSLR cameras have electronic framing grids that can be activated from one of the digital menus. Some cameras have changeable focussing screens that achieve the same purpose. These simple rectilinear grids appear in the camera viewfinder and/or LCD screen and help simplify the process of squaring up images. In order for the image to be perfectly squared up, the camera has to be pointing at 90 degrees to the copy area and the back of the camera has to be parallel to the baseboard/copy surface. The copy surface and camera back don’t necessarily need to be perfectly horizontal, but should be perfectly parallel to each other. An inexpensive digital level can be used to simply align the camera back to match the copy surface or baseboard.
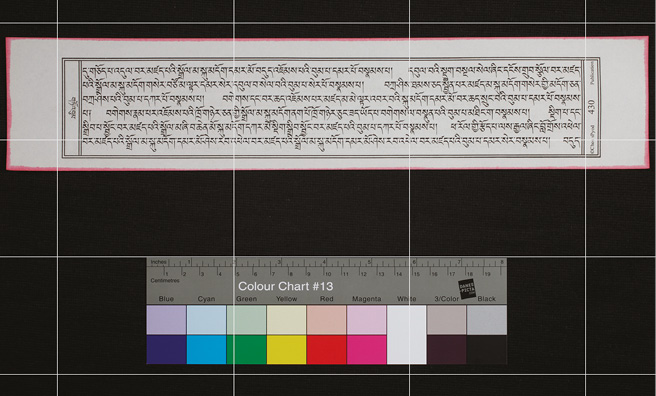
Figure 14. Electronic grids assist with the alignment of objects when copying. Photo © Patrick Sutherland, CC BY 4.0.
Tripods, copy stands and remote controls
Use of a tripod or copy stand is essential when photographing archival material. Tripods and copy stands hold the camera still and, provided they are not subject to movement or vibration, will minimise camera shake. Such supports help to achieve very sharp images even with low level ambient light exposures when slower shutter speeds are common and camera shake most likely. But equally importantly these supports allow the photographer to precisely control the framing of the material being copied, and to fix the focussing in low light conditions.
Remote controls
When mounted on a tripod or copy stand, the camera can be operated conventionally, with the user manually selecting all the settings on the camera itself, via the physical dials and the on-screen menus. The actual photograph can be taken by directly pressing the shutter button. However, while this is a perfectly acceptable approach in normal photography, it has disadvantages when digitising. Firstly, it is difficult to press the shutter button on the camera without introducing some element of ‘camera shake’, particularly when using slow shutter speeds. Secondly, to manually operate the camera you clearly have to be standing next to it. This is not always practical if the camera is mounted high up on a copy stand or tripod. Moreover, if working on your own, you may also need your hands to hold down or steady your manuscript!
Using a remote control/remote shutter release will help to avoid camera shake. It can also speed up the copying process. Using a copy set-up with a rigidly mounted camera and a remote control allows for rapid copying of a series of identically sized objects (unbound book pages, for example). These accessories allow you to trigger the camera shutter without having to touch the camera. They come in two kinds. Wireless remote controls like the Nikon ML-L3 or Canon RC-6 operate on a wireless or infra-red signal and, provided the camera has been set up to accept this signal, will trigger the shutter from up to 5m away. The remote has to be pointing at the camera. All such units require a battery.
Other remote controls like the Canon RS-80N3 are cables connected to a special camera port. They still require you to be close to the camera and you have to be careful to keep the cable loose so that the camera is not pulled when the exposure is made. (N.B. Check which specific remote works with the camera model you have chosen to purchase.) Some of these non-wireless remotes operate without a battery.
A further alternative is to use camera tethered shooting, where the camera is triggered from a computer. Tethered shooting is a more advanced form of remote control. Here, the camera is linked to, and operated almost entirely from, a computer. The camera is connected via a cable to the computer’s USB port, hence ‘tethering’. Operation of the camera is via a software program: Nikon’s Camera Control Pro has to be purchased separately, but Canon’s excellent EOS Utility comes free with its cameras. Other commercial software will perform the same function, including Adobe Lightroom.
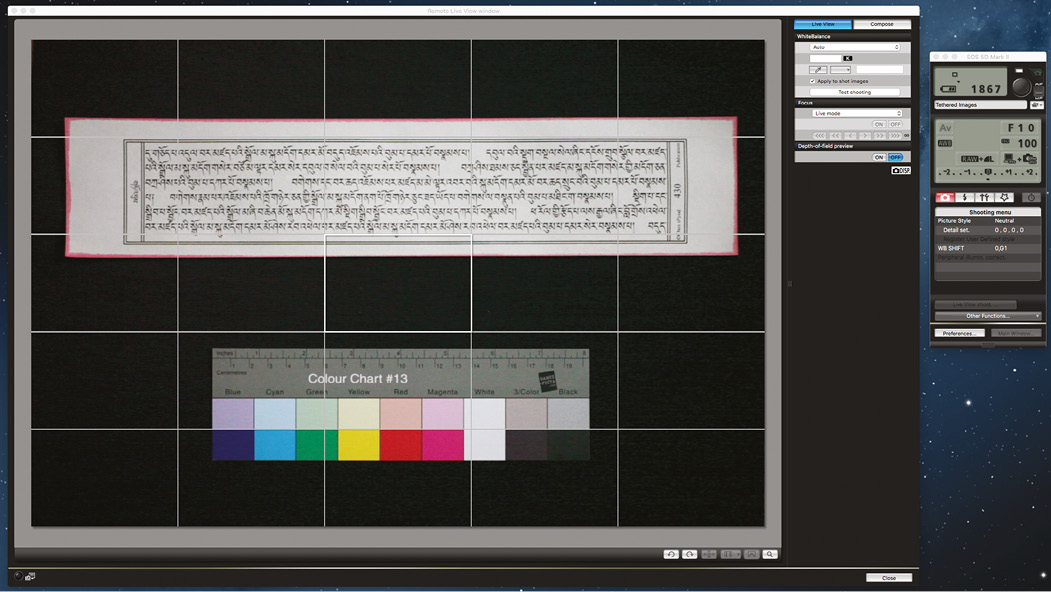
Figure 15. EOS Utility. Photo © Patrick Sutherland, CC BY 4.0.
In tethered shooting, the only time the camera needs to be touched is to set the physical dial for exposure mode (Aperture Priority or Manual) and, if using a zoom lens, the focal length also has to be set manually. All other functions are performed remotely, while tools such as histograms are also accessible on-screen.
Tethering has the advantages of remote shutter releases, and more:
- You can record images to the camera’s memory card, directly to the computer hard drive, or to both simultaneously. If you record to both card and computer, you will have already made a second copy of your images (i.e. an instant backup).
- Assuming your camera has a Live View function, the image you are about to take will be visible on your computer screen. What you see is what you will get, and if adjustments are needed (for example to framing), these can be made before taking the photograph.4
- Photographs can be reviewed on your computer immediately after they have been taken. You do not need to rely on the camera’s own small screen, which in any case may be awkwardly high up on a camera stand.
Copy stands have significant advantages over tripods in that they are designed specifically for copying. They are easier to set up and more stable, and it is much easier to get the camera exactly parallel to the baseboard on a good copy stand than on a tripod. They consist of a vertical column attached to a rigid base. A moveable arm attached to the column allows the user to position the camera directly above the baseboard and vary the height of the camera to take account of the dimensions of the material being copied. A portable spirit level will help check that the camera back is positioned parallel to the baseboard. The height of the column determines the maximum size of item to be copied.
With a 50mm macro lens on a full-frame DSLR, a copy stand with a 70cm column will allow copying of material from approximately 5 x 7.5cm to approximately 28 x 42cm. The rigid base makes copy stands less portable than tripods, though the column can be detached from the baseboard for transportation. Lack of portability is less of an issue if all the copying will take place within one institution.
Some DSLRs have tilting LCD screens. Tilting screens are very useful when copying with the camera on a copy stand, when the height of the camera can often make viewing a fixed LCD screen or through a normal viewfinder awkward.
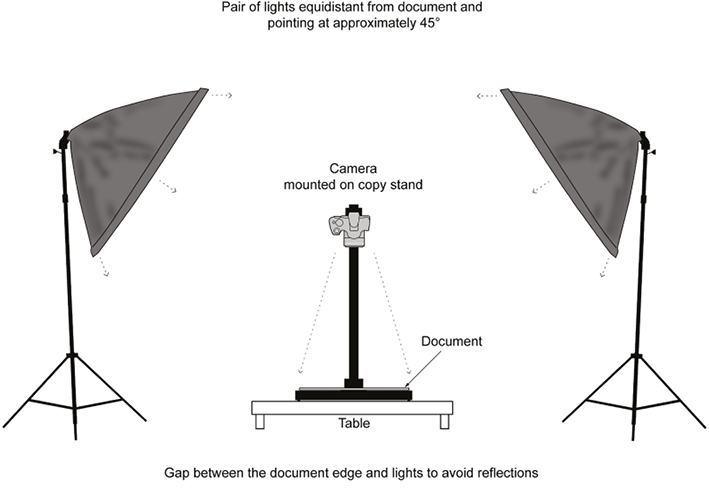
Figure 16. Copy stand with angled lights. Illustration © Anne Leaver, CC BY 4.0.
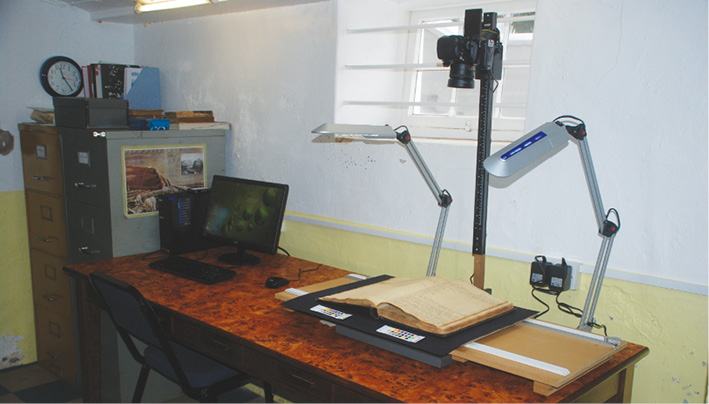
Figure 17. EAP524, Camera and copy stand in situ in the St Helena Government Archives. Photo © Andrew Pearson, CC BY 4.0.
There are clearly limitations to the copy stand: the maximum height of the column is one, but there is also the problem that when using the camera high up a long column (over 75cm) you may start to include the base of the column in the frame. Up to a point, you can compensate for this problem by extending the distance between the camera and column. Some models have extension arms to help overcome this issue.
Kaiser is a well-established brand and supplies a modular range of copy stands: you can choose the height of the column, the size of the baseboard and the kind of lights attached. Some are quite portable, with others much heavier duty. Columns are detachable for transportation. Some smaller copy stands are available in portable kits, but always consider whether the column will be high enough for your needs.
It is usually possible to swivel the column of copy stands by 180 degrees or to mount the moveable arm in reversed position. It is then possible to use a copy stand to photograph much larger objects: position the copy stand on the edge of a firm table with the camera pointing to a low table or the floor. It is absolutely essential in this situation to heavily weigh down the base of the copy stand as this arrangement is otherwise very unstable.
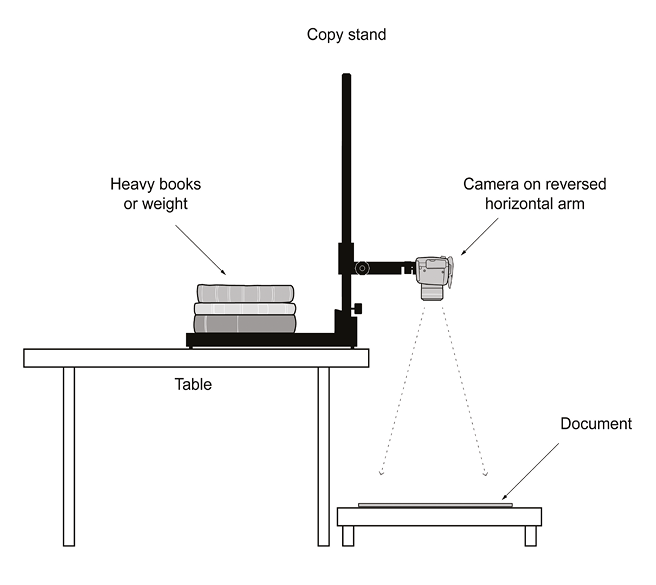
Figure 18. Diagram of copy stand in reversed position. Illustration © Anne Leaver, CC BY 4.0.
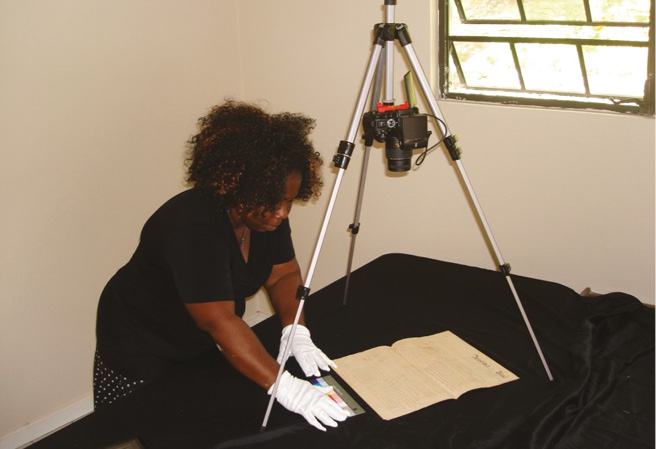
Figure 19. EAP769, Digitising using a tripod with camera attached to reversed centre column in Montserrat. Photo © Nigel Sadler, CC BY 4.0.
Tripods
An alternative to using a copy stand is a tripod. This may be a better choice if you are copying in many different situations and portability is a major issue. However, tripods are significantly harder to set up so that the camera and subject are perfectly squared up. There are hundreds of tripods on the market. A crude rule is that the heavier the tripod, the more stable it is likely to be, but of course the heavier it is, the less portable it is. You can add to the rigidity of a lighter tripod by weighing it down: some tripods have a hook at the bottom of the centre column to facilitate this. Make sure any weight attached is not left hanging free, as it could potentially swing like a pendulum and cause camera shake.
Tripods are excellent for copying items that are vertical or near-vertical. They are more awkward when used like a copy stand with the camera pointed downwards, because the camera and object have to fit between the tripod legs. You can reverse the centre column and place the camera close to the ground but that is also awkward. Some tripods allow for the angle of the legs to be varied, which makes copying easier.
All tripods with a removable tripod head can be fitted with a horizontal copy arm (e.g. those made by Manfrotto and Gitzo) which positions the camera away from the centre of the tripod. (You will need to remove the tripod head and fit the copy arm to the tripod’s centre column and then refit the tripod head at the end of the copy arm.) Importantly, positioning the camera on a horizontal copy arm places the weight off-centre and makes the whole camera/tripod set-up very unstable. This must be counterbalanced to avoid it tipping over and damaging equipment: loop a cord over the other end of the copy arm and weigh it down.
Some tripods have an off-centre column as standard. These can be used vertically like a normal centre column or easily repositioned into a horizontal position. Some models have a centre column that can be removed and positioned horizontally. Nevertheless, all tripods are significantly harder to manage than a simple copy stand.
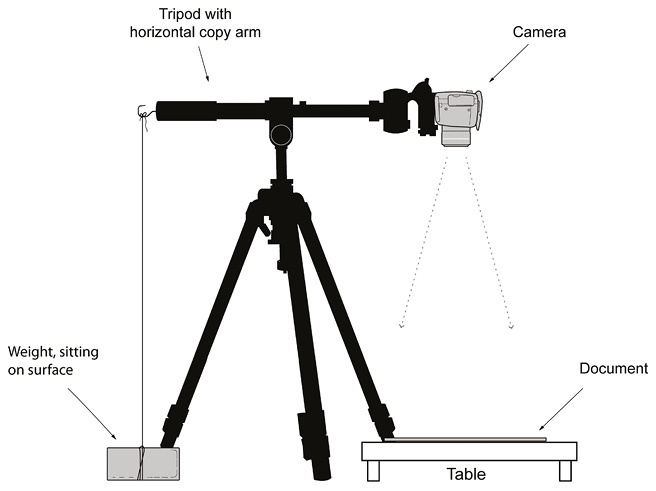
Figure 20. Tripod with horizontal copy arm. Illustration © Anne Leaver, CC BY 4.0.
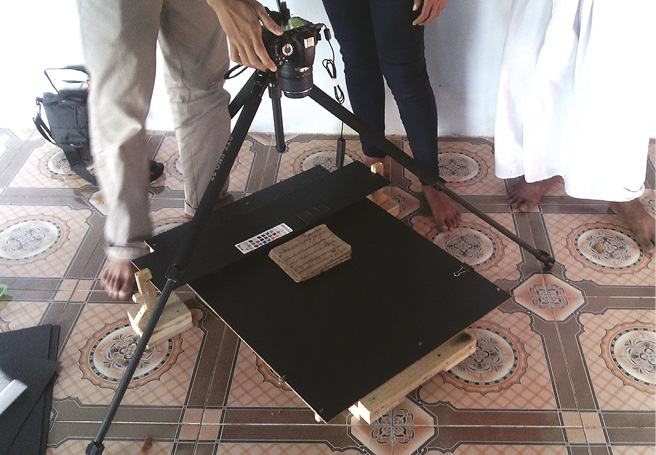
Figure 21. EAP698, Digitising Cham manuscripts in Vietnam.Here, a tripod and a portable platform are being used so that the manuscripts are not digitised on the ground. Photo © Hao Phan, CC BY 4.0.
Copy stand or tripod?
Advantages of copy stands
• Designed specifically for copying.
• Easy to set up with the camera properly squared up.
• More stable and rigid than a tripod.
Disadvantages of copy stands
• Most copy stands are not very portable.
Advantages of tripods
• A portable camera support that is easily transported and can be set up to photograph small and large items.
• Good for projects copying in multiple remote locations.
Disadvantages of tripods
• Harder to set up with the camera square.
• Awkward to use or unstable when copying with the camera pointing downwards.
Figure 22. Finding a solution when your copy stand breaks: EAP569, Using a weaving loom to digitise Nzema cultural material from Ghana. Photo © Samuel Nobah, CC BY 4.0.
Working with continuous lighting
Some modular copy stands are available with lighting kits. These lights can be attached to the baseboard and positioned at different distances and angles, which helps prevent reflections from shiny surfaces. The best lights are LED or compact fluorescent tubes, which do not generate heat and will provide an even illumination across the frame, when carefully positioned. These lights are long-lasting (8000 hours) but it is probably worth taking spares in case the bulbs are damaged in transit or fail part-way through the project. It is essential that all the lights being used are of precisely the same variety as otherwise a replacement bulb may well produce different coloured illumination and introduce colour casts.
If you are photographing objects larger than A3, then a copy stand with attached lighting may not be adequate. In this case, use lights which are separated from the baseboard.
Which light source?
Advantages of available light
• Daylight offers a free light source independent of electricity.
• Available light sources offer continuous light that is always visible (unlike flash), so surface reflections can be seen through the camera and controlled.
Disadvantages of available light
• The colour temperature of available light varies significantly.
• Care has to be taken with possible mixed lighting sources.
• Working outdoors potentially exposes archive material to dust, rain, wind and sunlight.
Advantages of electric lights
• A continuous light source that is always visible (unlike flash), so surface reflections can be seen through the camera and controlled.
• Dedicated LED lighting kits are available for some copy stands.
Disadvantages of electric lights
• Care has to be taken with possible mixed lighting sources.
• Lights are dependent on an electricity supply.
• Bright non-LED lights can get very hot.
Advantages of flash
Once mastered, a twin flash copy set-up offers:
• A very bright light source.
• Very sharp images with less risk of visible camera shake.
• A relatively portable lighting kit.
• No dependency on electricity (unless using rechargeable batteries).
• Flash overrides available light and eliminates most colour temperature problems from mixed lighting sources.
Disadvantages of flash
• Complex to set up and master.
• Expensive technology.
Figure 23. EAP454, Relying on basic desk lamps as the field workers move around the remote area of Mizoram, India. Photo © Kyle Jackson, CC BY 4.0.
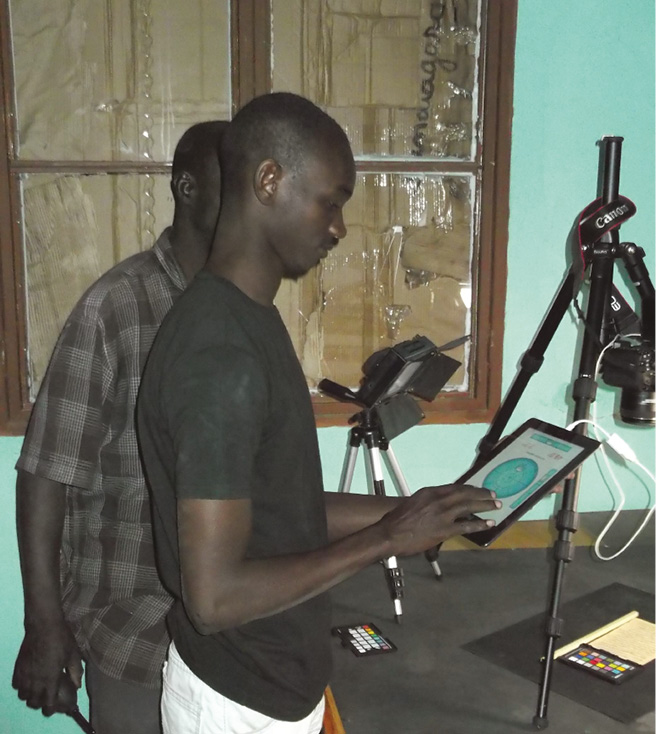
Figure 24. EAP764, Blocking out sunlight when digitising material from Bandiagara, Mali. Photo © Fabrizio Magnani, CC BY 4.0.
Electronic flash adds another level of complexity to the copying process and also adds significantly to the process of learning the camera controls. For that reason, the Endangered Archive Programme does not recommend using flash to researchers with little working knowledge of digital photography. However, electronic flash has some clear advantages, offering a very bright and repeatable light source that can speed up the copying process and remove the risk of camera shake caused by long exposures.
Some DSLR cameras have a small built-in flashgun, but this should never be used when copying as it will give very harsh and uneven results, especially at close working distances, and is likely to cause reflections from surfaces.
The ideal flash set-up for copying consists of two flashguns positioned equidistant from the material being copied and bounced off white reflectors, usually umbrellas. The umbrellas should be located on either side of the camera and pointed at the copying surface at an angle of about 45 degrees. Position the umbrellas far enough apart so that no part of the umbrella is directly above the material being copied.
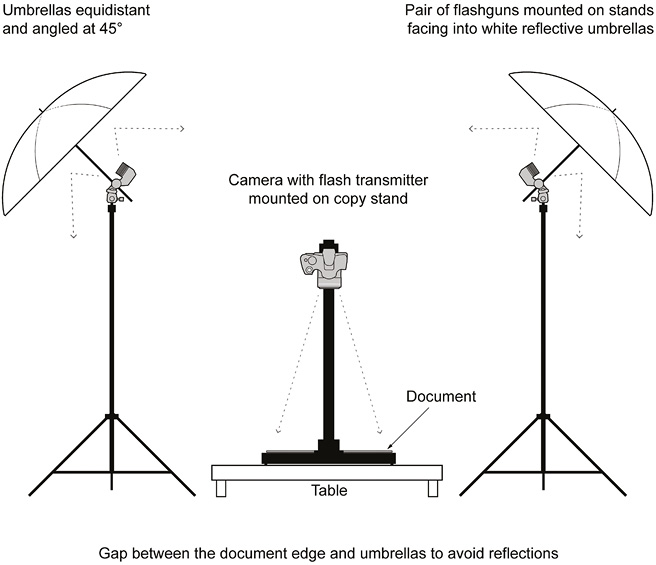
Figure 25. Drawn illustration showing the flashgun/umbrella set-up angled at 45 degrees to the copy surface. Illustration © Anne Leaver, CC BY 4.0.
Flashguns will need to be mounted on stands fitted with a lighting head that holds both the flashgun and the umbrella. The flashguns point into the umbrella so that this wide white surface becomes the source of illumination for the material being copied.
(N.B. If photographing outdoors, when the umbrella is unfolded, lighting stands are very susceptible to being blown over by wind.)
Despite the additional learning necessary, such a flash kit has several very particular advantages. Battery-powered flashguns are portable and not directly dependent on electricity. Bounced flash offers a very bright, diffused and even illumination that produces very sharp images because flash provides a very brief burst of light. In most indoor situations away from direct sunlight, flash overrides other sources of local illumination, thus avoiding problems with mixed lighting sources (though it is still good policy to turn off indoor lights).
To read more about this see the Digital Appendix 2 at https://doi.org/10.11647/OBP.0138.11
Copying glass plate negatives and transparencies
Most copying with scanners or digital cameras uses the light reflected from the surface of objects like paper documents. But some objects like glass plate negatives or other transparent materials need a system for recording the light transmitted through the object. Such items can be scanned using the film rather than reflective setting on a flatbed scanner or photographed on a light box.
If you have a large number of transparencies or slides to copy you should purchase a dedicated film scanner, which will scan both negatives and positives. Film scanners are available in various formats.
If you are copying a significant amount of material like this, you will need to plan for the largest such items and choose a scanner or light box that is big enough to cope with the largest item. Scanners and most light boxes will need a reliable electricity supply.
When photographing glass plate negatives on a lightbox it is best to copy in near darkness, so that the only light source is the light transmitted, otherwise the camera may record surface reflections from the glass itself. It is also useful to mask off the area around the glass plate to avoid flare. If you are copying a large number of glass plates, then two L-shaped pieces of black card will simplify the masking process.
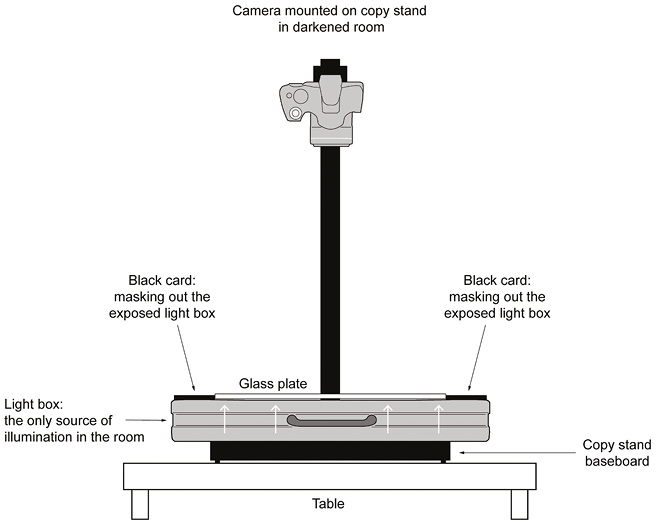
Figure 26. Equipment set-up for digitising glass plate negatives using a copy stand and a light box. Illustration © Anne Leaver, CC BY 4.0.
Photographic equipment for the field
• An APS digital camera, macro lens and wide-angle to standard zoom lens with close focussing or macro capability.
• UV protection filters for all lenses.
• Spare camera batteries (at least one).
• Spare charger (a good idea if electricity is unreliable).
• A spare camera body (a duplicate of the chosen camera or perhaps a cheaper APS camera) for larger projects.
• A remote control to fit the specific camera model.
• A full-frame digital camera and 50mm standard lens or macro lens.
• A wide-angle to standard zoom lens with close focussing or macro capability.
• UV protection filters for all lenses.
• Spare camera batteries (at least one).
• Spare charger (a good idea if electricity is unreliable).
• A spare camera body (a duplicate of the chosen camera or perhaps a cheaper full-frame camera) for larger projects.
• A remote control to fit the specific camera model.
A copying kit
• A copy stand.
• Alternatively, a tripod and lateral arm/tripod with convertible centre column.
• LED lights or a portable flash set-up.
• Background cloth or card of neutral colour (plus gaffer tape to hold cloth flat and in place).
• Colour checker and measure.
• A small spirit level.
• Spare high-quality and fast memory cards (CF or SD or both depending on the camera model chosen).
• CF or SD card reader for the above.
• Two external hard drives to back up data.
A portable flash kit
• Two portable lighting stands.
• Two adjustable brackets to fit the flashgun and umbrella to the stands.
• Two white umbrella reflectors.
• Two flashguns.
• One optical transmitter.
• Spare sets of disposable lithium batteries or good quality rechargeable batteries if electricity supplies are reliable.
Other
• Full notes on equipment and documentation procedures.
• A bulb-style air blower, microfibre cloth for cleaning camera bodies, and lens tissues for cleaning lenses.
Essential equipment and skills
Digital cameras and flashguns have become extremely complex pieces of equipment. They and the manuals that accompany them can seem quite intimidating at first, but in fact, they contain far more information than you need to absorb to work effectively. However, it is absolutely essential that you purchase and get to know your equipment well in advance of taking it into the field. This may well take several days of practice and experimentation. Make notes of the key settings for camera and flashguns and take these with you into the field.
It is probably worth the small extra cost of buying equipment from a good local camera store, if that is possible, and benefitting from technical support from knowledgeable staff.
Essential skills for the digital camera
To be competent and confident, you must know how to:
• Turn the camera on and off, adjust the zoom, focus the lens, take photographs and view them on the rear LED screen.
• Attach and remove a lens.
• Set the exposure mode to Aperture Priority or Manual exposure.Change the lens from auto focussing to manual focussing.
• Adjust the aperture, the shutter speed and the ISO setting.
• Use the exposure compensation control when using Aperture Priority exposure mode.
• Set the correct exposure when using Manual exposure mode.
• Turn on the electronic grid in the viewfinder (or replace the focussing screen with a gridded screen).
• Turn on the rear LED screen and adjust settings displayed on the screen (aperture, shutter speed, ISO, auto white balance).
• View histograms on the rear LED screen.
• Set the camera to record in RAW.
• Remove, recharge and replace batteries.
• Remove and replace memory cards.
• Download the files from memory cards onto a computer and back up files from the computer to an external hard drive.
• Reformat memory cards within the camera.
There is a burgeoning international market in counterfeit digital goods. This is particularly common for peripherals like camera batteries and memory cards. Counterfeit camera batteries could potentially damage the camera or constitute a fire hazard. Counterfeit memory cards are also common and threaten the correct writing of files and long term reliable storage and retrieval of data.
Important: It is essential to purchase all digital peripherals from reliable sources. For example, we would recommend using genuine Nikon batteries in Nikon cameras and genuine Canon batteries in Canon cameras.
Practical advice for photography in the field
Electricity supplies and battery power in the field
If you are working in remote locations where electricity is unreliable, you will need spare camera batteries. Depending on the scale of the documentation being undertaken and the number of files being generated, you might need several extra camera batteries and perhaps should plan for spare charging systems. You will also need to check the availability of power supplies for recharging and the commonest local type of electrical socket. In remote conditions, electricity supplies can be very variable and recharging batteries and laptops to full capacity can be slow. For a large project you might consider a small portable generator and/or high quality solar chargers. In situations with variable electricity supplies, it is essential to invest in a heavy-duty surge protector to protect electronic equipment from damage.
Lithium batteries
Digital cameras, video cameras and many other electronic devices use rechargeable lithium batteries. N.B. Most airlines now insist that all spare or loose lithium batteries are carried in hand luggage (that is, unless they are inside the camera body).
Disposable lithium batteries are expensive, but are the best-quality batteries in terms of both power and shelf life. They also work well in extreme cold, continuing to function down to minus 40°C. Most conventional disposable alkaline batteries and rechargeable NiMH batteries lose power significantly when used below freezing point.
Altitude and hard drives
Conventional hard drives are the most common computer storage medium, used in laptops and external hard drives. They are spinning disks, which are at risk when working at altitudes above 10,000 feet. In extreme conditions, hard drives can be destroyed by being moved around at high altitude. In contrast, solid state drives (SSDs) have no moving parts and are unaffected by altitude. SSDs are available for use as internal drives for laptops or desktops and as external drives. They are significantly more expensive than conventional drives. If you are using conventional hard drives at altitude, it is essential that you turn off the computer prior to moving it, rather than putting it into sleep mode, or disconnect and turn off the external hard drive. Do not travel at high altitude with a laptop in sleep mode.
Care of photographic equipment
Modern semi-professional digital cameras are rugged and reliable pieces of equipment, with very good moisture and dust seals. They are therefore more suitable for surviving the rigours of fieldwork than cheaper models. However, all digital cameras are susceptible to problems caused by dust and moisture. You should avoid exposing the camera, lenses, batteries and flashguns to water, to high humidity and to dust. Store and ship cameras with dessicant pouches (e.g. silica gel) inside sealed watertight containers if working in humid conditions and dry these pouches regularly. Try to avoid changing the camera lens outside and never leave the camera without a lens or body cap attached. Always protect the camera and lenses when travelling.
Cleaning dust off cameras and lenses
When you change lenses, dust can enter the camera body and land on the filter in front of the sensor. This results in visible blotches that occur in the same place on every frame. They are most noticeable in large areas of lighter tones. Most cameras clean the sensor automatically when they are turned on or off. They do this by vibrating the sensor so that dust particles fall off, though there are times when dust specks are not removed by this process.
N.B. Dust on the sensor is only noticeable after you have taken a photograph and are reviewing it on the rear LCD or on a computer screen. Particles of dust that are visible in the viewfinder are either on the viewfinder or on the mirror inside the camera body. Such dust does not appear on the image and if distracting can be removed easily by a quick blast from a rubber bulb-style blower.
- Use a blower and then gentle wipes with a lint-free, clean, soft microfibre cloth to clean the camera body, viewfinder and LCD screens. Only use proprietary lens tissues to clean optical surfaces.
- Use a blower to clean the mirror: remove the lens and hold the camera facing downwards so that dust particles can fall out of the body. Give several puffs of air to the mirror from a blower. Take great care not to touch the mirror. Never use a compressed air can.
Cleaning dust off sensors
Cleaning the sensor properly is a job for a professional service centre. You can render the warranty of a camera void by attempting to clean the sensor yourself. It is also very easy to damage a sensor by touching it and they are extremely expensive to replace.
However, in circumstances where there is dust on the sensor and the automated cleaning process is not working and there is no alternative, you can try the following:
- Switch the camera to manual sensor cleaning, which will lock up the mirror and open the shutter. Remove the lens, which will allow you to see the sensor, and then hold the camera facing downwards so that the dust particles can fall out of the body. Give several puffs of air to the sensor from a blower. Keep the tip of the blower just inside the camera and well away from the sensor. Under no circumstances touch the sensor. Do NOT use compressed air. Replace the lens, turn the camera off and then on again and take test shots to see if the dust has cleared.
- To check for dust on the sensor: choose Aperture Priority (A on a Nikon, Av on a Canon) and set the lens to f16. Fill the frame with a clean white sheet of paper or a similar single pale tone, focus and shoot. Examine the file on a computer screen. Repeat if necessary.
Camera bags are available in a bewildering variety, from rigid metal boxes offering the maximum protection for photographic equipment, roller bags offering the easiest form of transportation (provided you are not working off-road), to backpacks that offer ergonomic solutions to carrying weight. It is recommended that you purchase the bag after you have purchased the rest of the equipment and take into consideration the nature of the environment in which you will be working. The choice will depend on the amount of equipment you are carrying, and whether you will be working in a single archival institution or travelling. Even if you are working in a single archive, some kind of camera bag would be advisable for storing equipment and keeping it all in one place.
Although professional equipment is tough and reliable, it is quite susceptible to damage in transport. Good quality sealable plastic food bags are excellent for keeping dust off equipment. Bubble wrap is a lightweight solution to protect equipment in transit. Good quality sealable plastic food boxes can protect equipment from water and knocks.
What to put in the aircraft hold
If you are flying with equipment rather than purchasing it locally or shipping it separately, there are limitations to what you can carry in hand luggage.
Small items of equipment can be placed into sealable polythene bags, wrapped in bubble wrap, and then placed inside good quality waterproof sealable plastic food boxes and surrounded by clothing in luggage checked into the hold. Tripod and lighting stands benefit from being well wrapped in bubble wrap and carried in tripod bags.
Camera bodies, lenses and laptops are best carried in hand luggage, again individually placed into sealable polythene bags, wrapped in bubble wrap and then inside good quality waterproof sealable plastic food boxes or soft padded cases within a camera bag.
Hard drives and data management
Given the vulnerability of digital data when working in remote locations, it is probably worth investing in SSD (Solid State Drive) models for reasons of speed, overall reliability and the reduced risk of internal physical damage to moving parts. It is essential to check for compatibility with project computers when purchasing separate hard drives: external drives are available with a variety of different connection ports but USB 3.0 is common and works on Macs and PCs. Many external drives are bus powered, meaning that they do not need a separate AC supply but are powered directly by the computer through the connecting lead. This may be essential in some remote conditions. Other models have a separate AC supply and lead.
Managing digital files while in the field
It is very easy to delete original digital files by accident. It is recommended that, while in the field, you never delete files from the memory card. Only delete original files when you are certain that all the files have been checked and backed up.
When reusing memory cards, it is best practice to reformat cards within the camera rather than just emptying them by dragging the files off the card and into the computer waste bin. Reformatting memory cards helps ensure against folder and file corruption. Regular reformatting is good practice and should eliminate potential card errors. Never use a card that has displayed an error reading.
Reformatting destroys all the existing files and folders on the memory card. Make certain you have downloaded and backed up all the files in two or three different locations beforehand.
(For a detailed discussion of backing up data, see Chapter 5).
Hard drive and flash memory card capacity
A full-frame digital camera like the Canon 5D Mark II will generate RAW files of approximately 30 Mb (30 megabytes) or more. A 32 Gb (32 gigabyte) Compact Flash card or SD card will hold more than 1000 such RAW files while a 500 Gb (500 gigabyte) hard drive will hold more than 16,000 such files. Hard drives are a relatively inexpensive part of the overall budget, so always overestimate your digital storage needs.
Formatting hard drives for submission of material
Hard drives for PCs and Macs are not necessarily interchangeable. Researchers working with Apple Macintosh computers will have to reformat the external hard drive they submit to the British Library as exFAT or FAT32. This makes them readable on both Mac and PC. The FAT32 format does have some limitations, as it imposes an individual file size limit of 4GB. The exFAT format does not have this limitation. Drives submitted to the British Library should always be unpartitioned and never password protected. You can reformat hard drives on an Apple Mac via the Disk Utility software found in the Utilities folder, within the Applications folder that comes preinstalled on all Macs.
It may be felt that a flatbed scanner is the most appropriate equipment for your project, but do not be misled into thinking it is an easier option than a camera. The advantages mean that there is less potential for distortion when using a flatbed scanner and it is simpler to align the document. Scanners also export images in TIFF format which means you do not have to convert from RAW. However, the documents must be of a certain size and you need to have a reliable electricity supply if you wish to consider using a scanner.
Flatbed scanners have improved significantly, and they can produce excellent images. The information that manufacturers supply can be baffling, making the task of deciding which model to choose rather bewildering. The information below will hopefully help you with the various specifications and what to look for.
Resolution
Manufacturers can specify two types of resolution: optical or interpolated. You should only be interested in the optical figures which give you the best indication of how a scanner will perform. Optical resolution is shown in the format of two figures referring to samples per inch (for example 1200 x 2400 dpi). It is the first figure, which is the smaller of the two, that is the most important number. Ideally, it should not be below 1200 dpi.5
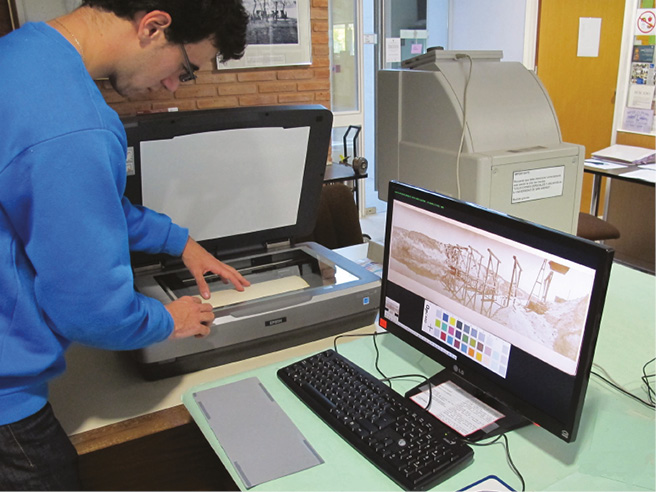
Figure 27. EAP563, Scanning photographs from the Hume family collection, Argentina. Photo © Silvana Lucia Piga, CC BY 4.0.
Colour depth
This may be referred to as colour depth or bit depth. It indicates how well the equipment can capture the colour range: the higher the number, the more accurate the colour. Scanners may capture at a higher bit depth but sometimes are only able to export at a lower depth; it is therefore important to understand the colour depth that the scanner will export and ignore the figure a scanner can capture. Colour is made up of three different channels: red, green and blue (RGB). The colour depth will either reflect each of the channels, in which case it will be given as 8- or 16-bit/channel, or it will combine all the channels and be shown as 24- or 48-bit RGB. The more accurate the colour, the bigger the image size and the more storage you will need. Usually for EAP projects, the recommendation is 8-bit/channel (24-bit RGB).
Noise
Noise is any unwanted energy that interferes with the image you wish to produce. Often this will be apparent by a grainy appearance, particularly in the shadow. To understand how much noise might be created, you need to look at the signal to noise (s/n) ratio that will be quoted on the scanner specification. Lower end scanners with an unacceptable ratio may not even quote this figure — this sort of scanner is to be avoided. Acceptable levels would be 60 dB for 8-bit/channel and 75 dB for 12-bit.
If you know the colour depth and the s/n ratio, you can start making informed decisions about which scanner to buy. A scanner with a high signal to noise ratio with 30-bit colour depth will outperform a scanner with a lower s/n ratio at 42-bit.
Dynamic range and dMax
Another specification that you should consider when purchasing a scanner is the dynamic range. This is the difference between the brightest highlight and the darkest shadow. This would be particularly relevant if you are considering a scanner to digitise black and white photography. The optimum scale has white (dMin) at 0.0 and the darkest black (dMax) at 4.0. Scanners cannot capture at these extremes but if a model claims to have a dMin of 0.2 and a dMax of 3.8, the dynamic range will be 3.6. The lower the dynamic range, the less likely the scanner will be able to reproduce the subtleties of shading and greyscale. If the specification only quotes the dMax figure, you want it to be as close to 4.0 as possible.
Scanning speed
When choosing a scanner, it is important to find out how long it takes to scan a document. Of course, the higher the quality of image, the longer the scan will take. If at all possible, ask for a demonstration before you purchase anything. If there are two models with very similar standards, the scanning speed may help you make your final choice.
Scan area
It is vital that you know the full extent of the dimensions of the material that you will be digitising. The most common size for a flatbed scanner is A4. A3 scanners are on the market, but anything larger is extremely expensive. There are also specific scanners that digitise film, such as transparencies, slides or 35mm film. As this sort of material would not normally fall within an EAP project, we have not covered this type of scanner. It is important, however, to mention that it is easy to break glass plate negatives when closing the lid of a scanner, so it is preferable to use a lightbox. If you do decide to use a scanner for glass negatives, please refer to page 78.
If you do not know the dimensions of the documents you are digitising, choose a camera and copy stand set-up rather than a scanner.
Colour management
It is important to calibrate the scanner and make sure that the colours are as true a representation as possible. Often scanners have built-in methods of calibration. An additional method is to use a colour checker and accompanying software. The chart uses precise colour and grey values and allows the scanner to make appropriate adjustments. It is important to calibrate the scanner on a regular basis (ideally on a daily basis or at the very least once a week); this way you know your images will be consistent throughout your digitisation project.
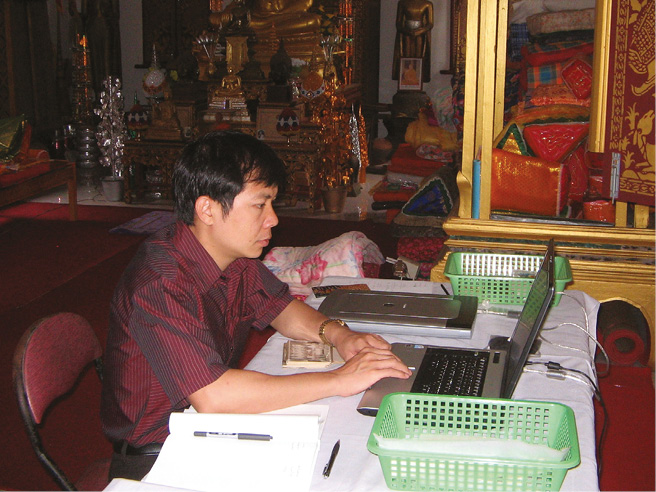
Figure 28. EAP086, A temporary scanning set-up while digitising photographs in a monastery in Laos. This highlights the methodical process required no matter where you are. Photo © Martin Jürgens, CC BY 4.0.
1 Digital camera technology is continually evolving, and manufacturers may well develop mirrorless camera technologies appropriate for digitisation projects in remote locations.
2 A colour cast is a tint of a particular colour, which is usually unwanted, and which affects the photographic image.
3 In this book we have called this a colour checker; it can also be referred to as a colour separation or colour calibration card.
4 If photographing using Live View and flash, on Canon cameras you will need to disable ‘exposure simulation’ (which is enabled by default). Otherwise, because the camera does not know you are using flash, it will show exactly what you would get with your aperture and exposure settings if relying on ambient light — which is likely to be nothing but a black image. By disabling exposure simulation, the Live View function will amplify the ambient light to provide an image that can be used for composition and focusing. If using Nikon Capture One tethering software, there is a button on the Live View display that allows the user to toggle between these two ways of using Live View.
5 You may also see ‘spi’ or ‘ppi’, but they all describe the same resolution.

