


5. A workflow for digitisation
© Butterworth, Pearson, Sutherland and Farquhar, CC BY 4.0 https://doi.org/10.11647/OBP.0138.05
This chapter sets out a workflow for a digitisation project. It considers the entire process, from setting up, through digitisation, to file export, backing up and final deposit of a digital archive. This workflow should be considered as a guide rather than a prescriptive order, since every project will be slightly distinct from the next. The first elements of the workflow are perhaps those most liable to need adaptation. What is presented here refers to the digitisation of a collection that is held in one repository, and where the materials are digitised at a single central location. Arrangements would clearly have to be different in an itinerant project, where the photographer travels to the documents, and some of the check-in/check-back systems would probably be irrelevant.
The workflow can be divided into a five-stage process:
- preparation;
- creation of the digital images;
- renaming and organising the digital images;
- exporting the digital images;
- backing up.
To read more on the digitisation process see also Digital Appendix 3 at https://doi.org/10.11647/OBP.0138.11
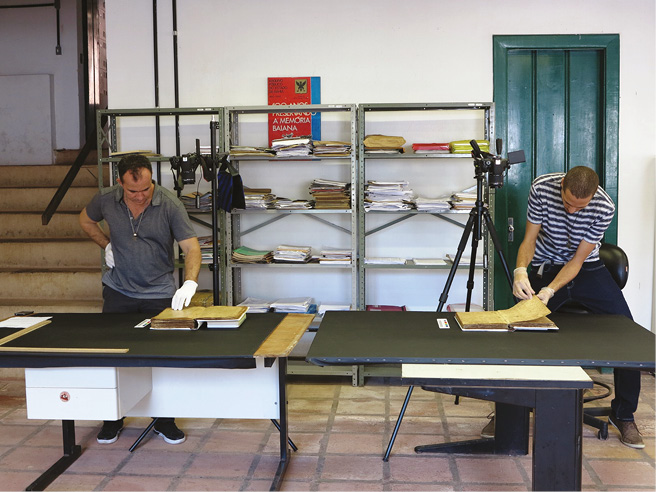
Figure 34. EAP703, Digitising notary books in Bahia, Brazil. Photo © João Reis, CC BY 4.0.
This stage involves work with the original collection, in order to prepare it for digitisation. It also includes the setting up of the systems that will track the location of individual documents, and the progress of the project as a whole.
Ordering the collection
As far as circumstances permit, it is advisable for digitisation to address a collection whose composition is understood and which is reasonably well-ordered. At its most basic, this means that every document in the collection is known and can be digitised. Meanwhile, on a day-to-day basis, it makes the finding of individual documents a quick and easy task, as opposed to an inefficient, time-consuming exercise.
Where a project targets a catalogued collection that exists within a well-organised archive, this work will be unnecessary. However, in an unsorted collection, a list will be needed to at least the level of individual volume titles. Without this, it will be impossible to track overall progress, or even to know when the task of digitisation is finished.
While this list is essential, it is recognised that circumstances may not always allow the physical reorganisation of the collection. The place of storage may be too small, for example, or the custodian may not permit you to move items about. If so, this is a situation you will just have to cope with as best you can.
Control systems
Document tracking. If removing documents from a store, and particularly if they are being taken to a different venue to be digitised, it is necessary to have an audit trail for their location. This is essential because:
- it shows where every document is at any given time;
- it protects the original custodian, who is letting the document out of their control;
- it protects you, as you are taking possession of the document and thus have become responsible for its care.
This tracking can be achieved by a simple check-in/check-back form, an example of which is given in Figure 35. Here, for every individual document there is a pair of signatures required when it is removed from the archive, and a second pair when it is returned. Assuming that this form is always used, there can never be any doubt as to what document is where, or any ambiguity about who currently holds responsibility for it. Should a document go missing, the form will show the date of its movement and its last known location.
A parallel measure is to insert a labelled marker into the place in the shelf from which the item has been removed. This again will clearly show what items are not present. When the item is returned, the marker is removed.
If thought appropriate, the signees may also verify the condition of the document at the times of its issue and return. In the event of any damage occurring, this may indicate the point that it came about (and therefore under whose custody). Caution is needed, however, as original condition and subsequent ‘damage’ may be difficult to define or agree upon, particularly if one party does not see the document for a long time. The system must only be there to identify documents that are in an obviously poor condition at the time of issue, and to flag up any gross instances of damage to a document on its return.
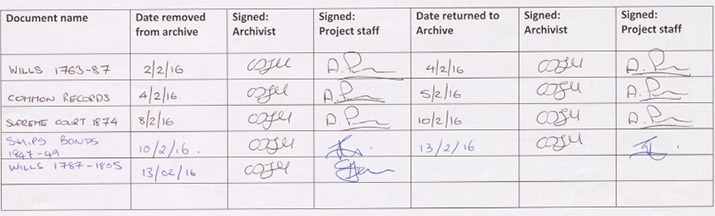
Figure 35. Example document tracking form. Photo © Andrew Pearson, CC BY 4.0.
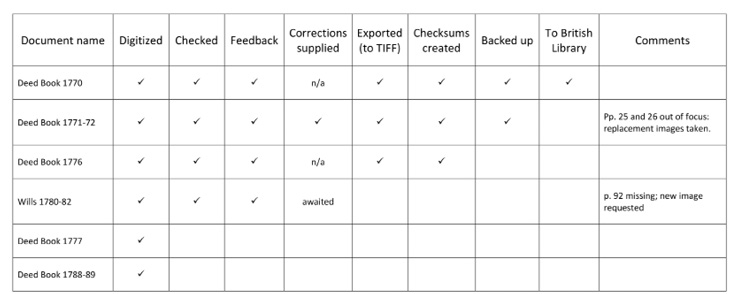
Figure 36. Example digitisation tracking form. Illustration © Andrew Pearson, CC BY 4.0.
Project tracking. This element of tracking is purely for internal project use. It comprises a list containing every item to be digitised, with each line showing the state of progress for a particular document. The exact structure of the form will vary according to the project. In the example in Figure 36, the form deals with a situation in which the digital photographs are being taken by local staff, then checked by their line-manager (in this case the project director). Rather than being printed and hand-signed (as for the document tracking sheet), this document is best maintained on computer as it will be constantly in flux.
The exact structure of the form will vary according to the project. In this example, the form deals with a situation where the digital photographs are being taken by local staff, then checked by their line-manager (in this case the project director). Feedback is given on the digital images (identifying any issues of quality or composition, for example) and, where errors are found, replacement images are taken. The column for backing up refers to the project backup system, while the next column records whether the image set for that document has been migrated to the British Library’s server. Only when all boxes are ticked (as for the 1770 Deed Book) can the work on the document be considered complete.
This issue will only be relevant if digitisation is being carried out somewhere other than the documents’ place of storage. Where this is the case, the logistics are worth considering in advance — for example:
- How far will the documents need to be moved? Can you carry them by hand or will you need a vehicle?
- What will you carry the document(s) in? Are they already in suitable containers (e.g. an archive box in good condition) or will you have to buy/bring something for this task?
- How many documents will you move at once (and therefore have away from their usual place of storage)?
- What other factors might limit or affect the transport process? For example, is the archive store only open at certain hours or on particular days? Is your work location prone to heavy rain or other bad weather, such that it could be unacceptable to move documents at given times (and possibly for long periods)?
Creation of the digital images
Setting up
- Create the computer folder for the digital images for this particular document.
- Turn the camera and lights on.
- If using tethered shooting, activate the software and the Live View window.
- Set the camera settings (image format, aperture, shutter speed, ISO — as required).
- If using tethered shooting, specify the destination folder for the images.
- Lay out the document ready for photographing, and place the colour-checker cards.
Photographing
- Photograph an ID Shot.
This is a form on which you record the details of the document to be digitised. It provides the key means of identifying the digital images that are about to be taken: even if the files are subsequently mis-named, this form will allow you to see which document they relate to. As a minimum, the form should state the project name and/or code, and the document name, title or code. Other information can be useful, such as the date of digitisation and the name of the photographer, plus any other comments you may wish to record (for example, about the document’s condition, or the circumstances of the photography).
- Begin photographing the document, starting with the spine and front cover for bound volumes.1
- After 10 photographs, use an image browser to check: are the images in the correct format? Is the document layout satisfactory? Is the image quality and focus good? Assuming yes, you may proceed to the remainder of the document. If anything is not satisfactory, delete the images, make the necessary corrections, and reshoot from the beginning.
- Continue photographing to the end of the document, finishing with the back cover for bound volumes.
- Photograph a Condition/Comment Sheet.
This latter form has several functions. First, it will clearly show that digitisation of this volume is complete (this is obvious for bound volumes, but far less so for unbound documents). Second, it is a useful place to record detail needed for cataloguing, particularly about the document’s physical characteristics, e.g. the number of pages or folios and the volume’s dimensions. Finally, since every page has now passed under your eyes, you may record any other observations made during photography, for example the document’s general condition, or the presence or extent of water or insect damage.
- Open the photographs in an image browser.
- Browse through the files in order and confirm that no pages have been missed (this is easily done by checking that the gutter of a bound volume alternates with each image).
- Identify any images where the quality, layout or sharpness of focus is not adequate.
- Re-photograph any missing pages, and pages with errors.
If a replacement image is shot, the original file needs to be removed and the new image stitched into the identical place in the sequence. (For example, if the photograph of page 72 is incorrect, you must delete it, then rename the replacement such that it will appear in the file sequence between the images for pages 71 and 73.)
Renaming and organising the digital images
During this stage, the file names are changed from those generated by the camera (e.g. DSC 001) to names that are specific to the document you have photographed. Renaming files manually is impractical and simple software packages exist that can do this operation for large batches of files.
- Import the files into the batch renaming software.
At this stage you must confirm that the file sequence is correctly sorted — i.e. that it begins with the ID shot, and proceeds page by page through to the back cover and End/Condition form. Sorting options include by name, date/time taken, or by attributes (e.g. file type, size). It is crucial that your sequence is sorted by file name, as the alternatives could order your files in a different sequence — i.e. one that bears no relation to the order of the original document.
Usually this will comprise the project code and document title, followed by the photograph number. By doing this, you create a unique identifier for each of the files, one that will not be duplicated within your project or by any other. Thus, for example, for the project EAP 794, the photographs for Deed Book 1834 are named as EAP794_Deed_Book_1834_001, followed by 002, 003, and so on.
Developing and editing are two distinct processes. Digital developing comprises the adjustment of the image, for example of colour or contrast, in much the same way as film would be processed in a dark room. Changes are made, but the actual content of the image remains unaltered. This is distinct from editing, where the content itself is altered: for example, by airbrushing. Given that the purpose of archive digitisation is to faithfully record the artefact and its information, making any such alterations or elisions is entirely unacceptable.
Developing and exporting the digital images
During this stage the RAW files are exported to a suitable output format (always TIFF for EAP projects). This creates a parallel set of files: the original RAW files are not overwritten.
Importing
- Import the files into the photo processing software (e.g. Lightroom).
- Confirm that the sequence is sorted by name (as above, not by date/time taken or any other attribute).
Developing (optional sub-step)
- If necessary, rotate the images to the correct orientation. (N.B. EAP expects all images to be supplied to it in the correct orientation.)
- Carry out any developing processes.
Image software allows for numerous adjustments to be made, comparable to the development processes of a darkroom for film photography. Generally, only the most basic developing would be undertaken for an EAP project: for example, to correct the colour balance (by means of sampling the colour checker card) or applying lens calibration (which can be used to square up images that are warped by wider-angle photography — though only to an extent). As far as possible, however, avoid this step or do an absolute minimum: ‘developing’ your images may make them more pleasing (to your eye, at least), but risks taking them further from the original — which is, after all, what you are attempting to record. Bear in mind also that the receiving or funding organisation may not accept images that have had extensive or inappropriate development applied to them.2
Exporting
- Create the destination folder for the images to be exported to.
- Export the images to the required format.
- Once the export process is complete (this may take several hours, depending on the number of files) check the product: is the file type correct, with the specified attributes? Are the correct number of files present? Is the file order correct?
Checksums are used to ensure the integrity of a file after it has been transmitted from one storage device to another: for example, between your primary dataset and any subsequent external backup. A checksum is created by a checksum calculator program and is appended to the dataset to which it relates (a checksum may be created for a single file, or for groups of files: for example, a complete folder of photographs). At any later point, the checksum programme may be used to verify the integrity of the data (whether the original dataset or a copy or backup). The program compares the checksum against the data: even a tiny change to the dataset will result in a completely different checksum value, generating an error report. Larger changes will also be identified: for example, a missing file.3 EAP requires a checksum for every digital folder of images.
Data loss is an inescapable reality of the digital age. Everybody reading this book will have lost electronic files at some point, whether the latest version of a document, a few personal photographs, or something of larger proportions.
The purpose of archive digitisation is to safeguard the information contained within documents that are at risk of destruction, either through natural or human agency. The survival of some collections may be uncertain even in the immediate future; others may be so poorly preserved that handling for photography may be possible once, and once only. It is therefore an imperative that the digital data generated from any physical collection is protected from loss.
Commercial companies and academic institutions have complex systems of data storage, both in-house and off-site, managed and maintained by specialist staff. Ultimately the digital data from your project will be migrated to such systems and, major catastrophes aside, will be permanently safeguarded. This section addresses the preceding period, while the data is being generated by, and in the sole possession of, your project. This is the stage at which the data is most vulnerable.
Backing-up is a crucial process that everyone should do in order to have a fail-safe. The principle is to make copies of particular data in order to use those copies for restoring the information if a failure occurs, whether due to deletion, corruption, theft or viruses. Some basic principles are as follows:
- Back it up as soon as possible. Never rely on a single copy for longer than you have to, whether it is on a camera memory card, a computer, CD or an external hard drive.
- Split it up. Even if you have made multiple copies, the dataset is still at significant risk while they are kept in the same location. Think about heading off the obvious worst-case scenarios. If your bag was mislaid or stolen while travelling, would all your data be lost with it? Could a fire at your property destroy all your copies? While in the field, consider how you might get around this risk, particularly in terms of loss in transit. As a minimum, split the copies across your bags (including hand and cabin baggage), and ideally across multiple people. Some other options include:
- Leaving a copy with somebody local, to be retrieved later, or posted on if your copies are lost or destroyed.
- Uploading the data to Dropbox or a data-sharing website.
- Posting a second copy of the data to yourself.
- Keep control of your backups. Have a primary dataset from which all backups are generated. It is no good making multiple copies, but doing so in such a chaotic way that you have no idea which is the current and most up-to-date version.
- Use backup software. Simple and inexpensive programs exist that will copy data. Never use the manual ‘copy/paste’ or ‘drag/drop’ methods: these are too prone to user error.
Types of backup
There are three principal forms of replicating data: backup, mirror, and synchronisation. In the following discussion, the original dataset is termed the Source; the place to which it is copied is termed the Destination.4
Initially, replication will begin with a simple copying process, as the files from the Source are duplicated in a new empty Destination. After this point the different types of replication will lead to different outcomes.
Synchronisation
In Synchronisation, files are copied in both directions (from Source to Destination, and vice-versa), creating identical datasets with everything held in both. This is commonly used by home-users, particularly for their music collections. However, it is not recommended for backing up the data from a digitisation project, since it is advisable to have a one-way process, from your Source dataset (which you may be modifying and updating) to the Destination.
Backup
A Backup copies files in one direction: from the Source to the Destination. It does not involve the deletion of files. Because of this, after the initial copying, the Destination will not be a duplicate of the original dataset. Rather, it will be larger, containing files that have been deleted or renamed on the Source. Backups have the advantage that data accidentally deleted from the Source can be retrieved from the Destination. On the other hand, backup datasets become increasingly large as time progresses, including numerous files that are superfluous or out-of-date, and which have been deliberately removed from the Source.
Mirror
Mirror is a backup that also replicates deletions (to be more accurate, ‘absences’) on the Source to the Destination (i.e. it removes ‘orphans’). Mirroring therefore ensures that the Destination contains exactly the same files as the Source, and nothing else. It is not the same as a simple Backup because it deletes files. It is also not the same as synchronisation because it only copies files in one direction.
Using a Mirror profile requires you to accept the risk that accidental deletions from the Source will also be removed on the Destination. If you delete a file by mistake, and don’t realise until after the next backup run, then that file will be irretrievably lost. Its advantage is that it creates a minimal-size dataset which will comprise only the current project files.
Table 4. Summary of backup rules. Based on profile descriptions from Syncback SE.
|
Backup |
Mirror |
|
Files will be copied from Source to Destination |
Files will be mirrored from Source to Destination |
|
If the same file has been changed on both Source and Destination then the file on Source will replace the file on Destination |
If the same file has been changed on both Source and Destination then the file on Source will replace the file on Destination |
|
Files only on Source are copied to Destination |
Files only on Source are copied to Destination |
|
If a file is only on Destination then it is ignored |
Files only on Destination are deleted |
Backup or mirror?
Users must decide whether Backup or Mirror is the most appropriate method. As discussed above, both have advantages and disadvantages. However, the two may be used in parallel.
A basic, ‘manual’ method is to have two Destinations, one being a Backup, and the other a Mirror. Doing this makes for a somewhat more complicated data-management process, but it exploits the best attributes of both backup and mirror. On the backup destination you will have a complete dataset of every file you have ever created, enabling accidental deletions to be retrieved; on the mirror you will have a dataset which can be used to restore your current data, and which is a ‘tidy’ copy of the dataset which can be transferred to the receiving institution (which will not want extraneous files).
The same process can be done automatically with certain backup software programs. Backup protocols can be set up, such that when a file is changed/deleted on Source it will also be changed/deleted on the Destination but will also be put aside in a separate directory. This directory serves as insurance against accidental changes and deletions, though of course it will add (possibly very considerably) to the volume of backed-up data.
Never entrust a hard drive containing the day’s data to anyone (including other team members) before you’ve copied the content to a secure place. Then, make an additional backup.
Michael Gervers, EAP 254, EAP340, EAP526, EAP704, Ethiopia
A ‘digitising disaster’ is never quite as bad as it seems at the time and it is always possible to come up with a solution!
Sophie Sarin, EAP488, EAP690 and EAP879, Mali
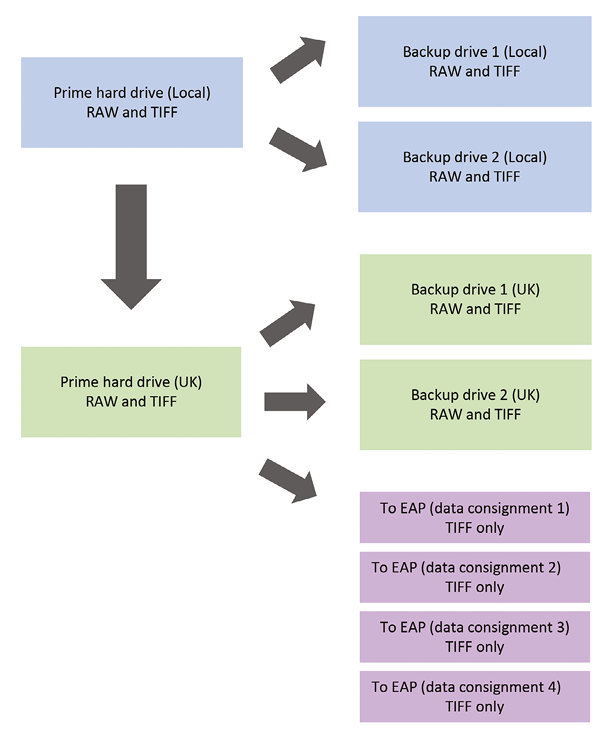
Figure 37. A field-based system for backup.In this model, all work is being undertaken locally — i.e. photography, checking and data export to TIFF all occur at the place where the documents are held. The flow of data is therefore one-way only. If only photography takes place locally, with checking and export to TIFF being undertaken remotely by the project manager (in this case in the UK), then the data flow will become more complex. RAW files will be transmitted to the UK, with the final TIFF datasets sent both back to the local drives, and onwards to the British Library. In both scenarios, however, the principle remains the same: of safeguarding the data by holding multiple backups in separate locations. The final datasets are dispatched incrementally to EAP, as soon as a meaningful volume of images has been compiled. This means that the data is held only on the project hard drives for as little time as possible. Illustration © Andrew Pearson, CC BY 4.0.
Using and maintaining anti-virus software is an essential part of data protection. Wherever possible, keep the software up to date via a connection to the internet. If that is not possible when in the field, virus-scan the data at the earliest possible opportunity on your return.
Cataloguing/creation of metadata
Although not the focus of this book, cataloguing and the creation of the metadata that accompanies your digital images (‘Listing’) is an integral part of the process.
EAP has stringent requirements for Listing, and issues a pro-forma spreadsheet into which all details must be entered. The mandatory information includes: the location and ownership of the original records, including any issues relating to copyright; the institutions where the data will be deposited; the technical specification of the images created and the equipment used to create and manage them (i.e. the camera and computer software); cataloguing details at the level of Project, Collection, Series and File — the latter being each individual volume/document that is digitised. Some of the technical data is required at the point when the data is accessioned by EAP, while much of the catalogue will ultimately be migrated to the British Library’s main catalogue.
The guidelines for correctly completing the Listing spreadsheet enter into considerable detail and fall outside the scope of this book. Nevertheless, several points do need to be emphasised:
- Do not underestimate how much time will be required for Listing — and certainly do not treat it as an afterthought!
- Study the Listing guidelines in advance, and in detail, so that you fully understand the requirements. If necessary, obtain copies of other projects’ Listings, to serve as guidance (though remember that your spreadsheet must be the most recent version, so you cannot adopt an earlier version as an exact template).
- Listing cannot be done retrospectively (e.g. after the rest of the project is complete). Some elements can be worked through from the comfort of your office back at home, but many important details — particularly about the physical characteristics of the materials — are practically impossible to determine remotely.
- In terms of workflow, the logical point at which to create the detailed cataloguing information is at the time of photography or — more precisely — immediately after you have finished digitising. The document is in your hands and is there to be measured and described. Each page has just passed under your eyes, so you will have been able to note any issues such as torn, stained or insect-damaged pages, or where pages are partially or completely missing.
- Back up the Listing spreadsheet as rigorously as you do your digital images. Re-entering the data for a large project could be incredibly time-consuming, and some information about the original documents may be difficult or impossible to retrieve from memory alone.
When all the necessary recording and data entry is done, you will have finished working with that particular document. Unless it is then to be the subject of conservation work, it can be returned to its archive or owner, and the process of digitising can move on to the next item.
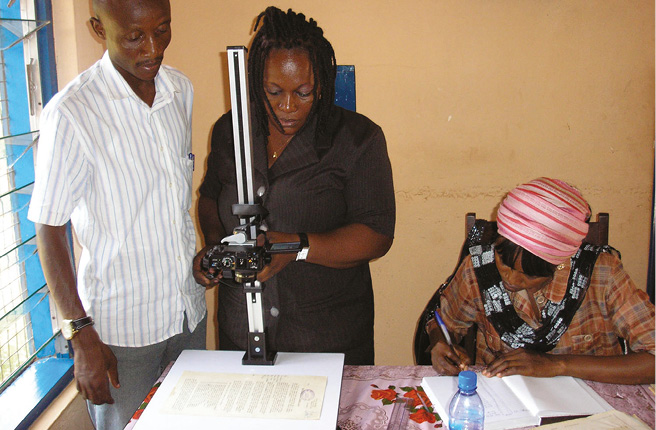
Figure 38. EAP256, Listing taking place alongside photography in Tamale, Ghana. Photo © Ismail Montana, CC BY 4.0.
1 An alternative photography method, which involves the shooting of all odd pages first, followed by the even pages in reverse order, is outlined in Digital Appendix 1. While more complex and potentially prone to error, this method has the advantage of reducing the amount of handling needed during the photography process.
2 This includes EAP.
3 As a word of caution, certain computer applications can occasionally add ‘hidden’ files to a folder: for example, Windows Explorer may add a thumbs.db after files are viewed. If present, such files will cause the checksum program to identify a discrepancy, even though all of the image files are present and uncorrupted.
4 The definitions given here are derived from the website for the backup software program Syncback.

