14. Recording Audio and Creating Soundscapes
© 2021 Darren R. Reid and Brett Sanders, CC BY-NC 4.0 https://doi.org/10.11647/OBP.0255.14
Your audience requires clear and well-recorded audio. They might be willing to accept poor imagery, but sound quality and, most importantly, clarity is non-negotiable — the sound-track matters.1 Your audience will immediately be reminded that they are watching a film if they have strain in order to hear its dialogue, and, in so doing, their immersion will be broken. Your audience needs to be able to invest their intellectual energy into what your film is saying, not squander it as they struggle to discern individual voices.
The debut of material from Christopher Nolan’s The Dark Knight Rises (2011) was slammed by audiences and critics for precisely this reason. In a preview of the film’s opening sequence, Tom Hardy’s Bane, the film’s central antagonist, spoke in a voice that was muffled and difficult to hear. Nolan, a highly skilled filmmaker, had sound reasons for muffling Bane’s vocals — the character wears a mask and, as such, his voice should have been difficult to hear. Audiences, however, were utterly unwilling to accept real-world logic in a cinematic presentation. Whether realistic or not, audiences demand clear audio in their films.2
No one wants to sit through a film in which the dialogue is not clear or easily understood. As a result, Bane’s voice was made to boom in the final mix of The Dark Knight Rises. It dominates much of the film and rarely is it difficult to hear or understand.3 Never cut corners on audio quality. Wonderful sequences can be ruined and made unusable by poor or inaudible sound.
Recording Sound on Site
Recording clear audio essentially comes down to two factors — your recording equipment (i.e., the presence of a quality microphone and sound recorder) and its proximity to the sound you wish to record. By default, you will record some sound as you work in the field since practically all cameras have a built-in microphone, but you should work on the assumption that the quality of audio captured with such a device is likely to be poor, if not outright unusable.
On a DSLR, for instance, if you adjust the focus of your shot, the internal microphone on that camera will likely pick up the mechanical sound of your focus mechanism. As a result, if you have a subject speaking on camera, their dialogue will probably be buried under the loud, unpleasant sound of shifting and grinding gears. To make matters worse, sounds closer to your camera’s internal microphone will be much louder than more distant sounds. When shooting an interview, the internal microphone in your camera will pick up the ambient noise around it far more effectively than it captures the voice of your subject. Instead of relying upon your camera’s internal microphone, you should instead utilise other audio devices and microphones to ensure you capture clear, usable audio. This separately recorded audio track can be added to your footage during the post-production process.
On-site sound can be captured in several ways.
Rough and Ready
Place a mobile phone, recording via a sound-recording app, near to the person speaking. A mobile phone attached to a pole and held over the person’s head, but out of shot, will capture relatively poor-quality audio — but it will still be better than the audio captured natively on a camera’s built-in microphone.
Lavaliere Microphones
To record a person speaking, they should ideally be given a lavaliere microphone. These are small microphones that can be attached to the lapel of a person’s jacket. Although there are very cheap models available, we would recommend that you do not start at the lowest possible price. Such devices tend to capture muffled, poor-quality sound. We have had excellent experiences working with sound equipment by Rode. The basic Rode lavaliere microphone costs approximately $60 but captures a clean sound profile which works perfectly well for on-site discussions in documentary films.
Such microphones usually also require a sound recorder; however, some Rode microphones can record directly onto your smartphone. Using this solution, you will not require a standalone sound recorder, reducing your overall equipment cost.
Run and Gun
A lavaliere microphone is ideal for recording interviews, but it is not an ideal solution for recording more ad-hoc material. In situations where you cannot spend time wiring your subject for sound, you can usually add an external microphone to your camera. This will give you the option of recording higher-quality ambience and, if you purchase a directional microphone, the opportunity to capture audio emanating from a specific direction. Directional microphones pick up more of their sound profile from the direction in which they are pointed, allowing you to ‘run and gun’ with your camera/microphone setup. For events that are unfolding quickly, this solution will allow you to capture usable sound that will not require you to wire up your subjects with lavaliere microphones. As with capturing video, capturing usable sound becomes easier with practice and experience. From an early stage, filmmakers should experiment to ensure they identify the solution that will work best for them.
Clipping
When recording sound, you should pay attention to the amount of audio being picked up by your microphone/recording device. If a microphone is too far away from your subject, sounds may be inaudible or unclear. If it is too close, however, more sound may be entering the microphone than the device can handle. This is called clipping, and it creates a nasty, distorted sound which you should aim to avoid. The result is a sound which cannot be removed in post-production.
It is possible to visually identify clipping. If too much sound enters the microphone it will stop recording sound data at both the lower and upper extremity of the device’s range. On an audio recorder, recorded sound should look something like the sound wave seen in Figure 46a. Both the upper and the lower end of the sound wave are within the upper and lower limits of the recordable field — this is usable sound. Clipping, on the other hand, looks like that seen in Figure 46b.
Note how the sound wave hits both the top and bottom of the above field. The sound information that would appear above and below these sections simply does not exist, so rather than a smooth, curved sound wave, clipped areas instead end abruptly.
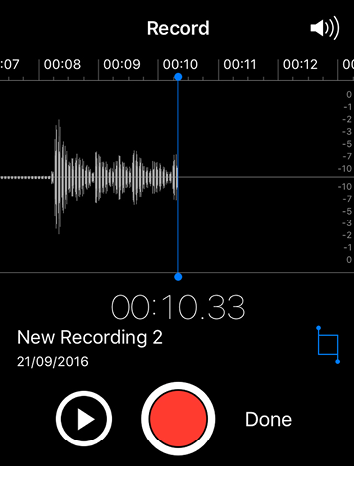
Fig. 46a. The sound wave fits comfortably within the recordable field.
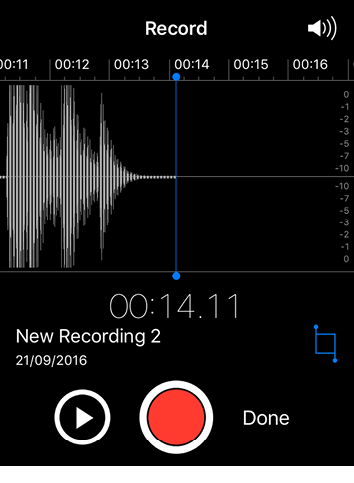
Fig. 46b. The device’s recording sensitivity is too high, or the microphone is too close to a sound source.
In order to avoid this, always test your microphone and recording environment prior to recording. Attach your lavaliere microphone and speak at the volume you intend to record (or have your subject do the same). If the sound wave is very small, you should probably move the microphone closer to your subject’s mouth. If the sound wave is too large and clipping occurs, or it looks like this might occur, move it further away or reduce the amount of sound your device is attempting to record.
On-Site Tips
When you activate your microphone/sound recorder, look at how much background ambience is being picked up by the recorder. If there is a sound wave of significant size already, you might struggle to hear the person being recorded unless the microphone is placed close to their mouth. This, however, can increase the risk of clipping.
If this happens you will either need to wait until there is less ambient sound or move to a quieter location. You should not be afraid to change your location if capturing clean audio is likely to prove difficult or impossible. As beautiful as a given setting may be, if you cannot record usable sound, the footage will be useless. Remember, when recording sound, particularly in the field, you must consider both the audio and the visual elements you will capture. As a result, you should reconsider locations such as busy cafes, particularly if the level of noise produced by the clientele is consistently loud or prone to unpredictable spikes. It only takes one person with a booming voice to turn a beautifully filmed section into an unusable piece of footage.
To that end, prepare contingency plans if you are planning on recording audio on site. Plan A should focus on shooting in your preferred location, but if there is an unpredictable noise profile, an alternative location will be needed. Your contingency should therefore be a location where you have much greater control over the ambience.
In the worst-case scenario, you can record new audio over pre-existing footage in post-production, having a subject repeat what they said in a more controlled environment. Syncing up such audio is, however, tedious and difficult to accomplish. You will have to line up the new audio very closely with the recorded footage; even a small discrepancy between sound and visual elements can pull an audience out of the moment. Instead, your priority should be on recording usable audio on site in the first instance.
Engineering Ambience
Film is often described as a visual medium, and there is a lot of truth to that idea — but it is not the whole truth. Sound, its presence or absence, is a huge part of the cinematic experience, even if it is not always the most important aspect. Although most of the information communicated via film is transmitted visually, an appropriate and enriching soundscape is important. Even in the silent era, sound was an important part of the process. Live musicians and orchestras — and sometimes sound effects — accompanied ‘silent’ films.4
As already discussed, recording clear vocal audio is essential — but so too is ensuring an appropriate ambience for your chosen visuals. The poor quality of most built-in microphones, coupled with their tendency to pick up nearby sounds (often the sounds made by the camera or its operator), can create serious issues.
Ambience can be recorded on site or it can be sourced from a sound-effects archive and added to your footage during post-production. For many, recording authentic ambience is important — but the internal microphone in most digital cameras will struggle to capture a balanced or usable ambience. Instead, connect a sound recorder or smartphone to a multi-purpose microphone to capture a space’s ambient sounds. As with recording footage, capture more audio than you require, and beware of objects or people near to your microphone, as any noises they make will feature prominently in your recorded ambience.
Just as when shooting in low-light situations, do the best you can with the equipment you have to hand. If you do not have a dedicated sound recorder or external microphone, record local ambiences with whatever equipment is available to you. The resultant audio may prove unsuitable or unusable, but if the conditions are correct, and if your luck holds out, you may record some usable ambience. If this is not successful, it is possible to engineer ambience during post-production. A wider range of sound-effect archives can be found online, where different ambiences can be purchased or downloaded freely. Applying these soundscapes to your existing footage is not difficult, though some sounds may need to be layered, depending on what is happening in your footage (see chapter twenty-three).5
Ambient sounds rarely need to be synced up to the original video; they provide atmosphere, not detail. If specific events occur on screen, however, such as a person in the foreground coughing, the appropriate audio, which can also be sourced from a sound-effect archive, can be easily applied at the correct moment. There are numerous factors that can prevent you from using the audio you capture in the field. Blowing wind can wreak havoc with poor quality, unshielded microphones, whilst off-camera activities can create recorded audio that does not feel appropriate for the shots you have captured. In such instances, employing a pre-recorded ambience may be a necessity.
There is a wide range of sound-effect archives online, some offering paid products, others offering free downloads. When using these archives, attention should be paid to ensure that you select an ambience that matches the visual element of your film. Like recorded dialogue, an audience is unlikely to appreciate the presence of a well-recorded or well-sourced ambience, but its absence may well be noticed. The majority of the work that goes into a production is invisible to its audience — the care and attention placed on clear audio is rarely celebrated, despite being an essential part of the experience.
Voice-Overs and Commentary
Aside from recording sound in the field, a documentary may require you to record an audio commentary. The narrator may, at times, appear on screen, or they may be completely disembodied; they may deliver their material deadpan or with personality, interacting with the visual element of the film. Either way, audio commentary needs to be clear and crisp. As with all dialogue, an audience will not tolerate inaudible or muffled narration. Even if the recording is not perfect, it must be clear.
To accomplish this, a high-quality desktop microphone should be used but, if you do not have access to such equipment, you will have to utilise the resources you have at hand. Employing a lavaliere microphone will not give you the same rich depth that a larger desktop microphone will, but the resultant recording will at least be clear. The prevalence of digital content creation, such as podcasting, has ensured that a wide variety of affordable, quality products are available at a range of price points. If you are able fund the purchase of a desktop microphone, this might well prove to be key investment.
To help in capturing quality audio you should:
- Speak clearly and slowly into the microphone. An accent is fine, but your audience must be able to understand you.
- Be prepared to dislike the sound of your own voice. Everyone hears their voice differently to how the outside world hears it. Whilst it is unusual to hear your recorded voice, you will quickly acclimate to how it sounds.
- Record in a room that does not echo — empty rooms, or rooms without a lot of furniture, will add echo to your voice that you cannot remove in post-production. Conversely, echo, if it is desired, can be added during post-production.
- If you cannot find a space that does not produce echo, create one. Sitting under a table, with duvets draped around it, will create a small space in which your voice will not echo.
- If at all possible, record each line in your script several times and get to know the idiosyncrasies of your voice. Do you raise it at the beginning of a sentence when reading from a script? If so, listen out for that and re-read your line. Did your voice crack? If so, re-read your line.
- Record your voice-over in one sitting (but not one take). Recording over several days will mean that atmospheric changes and subtle (but audible) variations in your delivery tone or pitch will create an uneven commentary track, which may distract your audience.
- Use a pop-filter — these inexpensive pieces of equipment will filter out pronounced ‘p’ sounds, which your microphone may pick up.
1 Barry Callaghan, Film-making (London: Thames and Hudson, 1973), pp. 88–103.
2 Borys Kit, ‘“The Dark Knight Rises” Faces Big Problem: Audiences Can’t Understand Villain’, Hollywood Reporter, 20 December 2011, https://www.hollywoodreporter.com/heat-vision/dark-knight-rises-christian-bale-batman-tom-hardy-bane-275489
3 The Dark Knight Rises. Directed by Christopher Nolan. Burbank: Warner Bros., 2008.
4 Rick Altman, Silent Film Sound (New York: Columbia University Press, 2004).
5 Roey Izhaki Mixing Audio: Concepts, Practices, and Tools (Burlington: Focal Press, 2013), pp. 5–11.