8. Core Methods
© 2021 Darren R. Reid and Brett Sanders, CC BY-NC 4.0 https://doi.org/10.11647/OBP.0255.08
If you are not used to capturing video or making films, as with any new endeavour, starting out can be an intimidating process. But it is also a wonderful and enjoyable adventure, rooted in just a few core methods that can be easily learned and memorised. There is every reason to turn any apprehension you may feel into excitement. Practice, of course, will be required for you to employ these basic rules effectively, but they should allow you, from an early stage, to start capturing competent, usable footage.
Stabilise your Camera
Always use a tripod or, at a push, a monopod — even when going handheld, attach your camera to a support mechanism of some kind. Avoid touching the camera if it is at all possible, as this can add unwanted movement to your footage. On a small preview screen, or even a mobile phone screen, the amount of shake transferred from your body to your equipment may not be particularly evident. In fact, you can walk away from a shot convinced that you captured a beautiful piece of footage only to discover that, upon review, it is mostly unusable. Luckily, the solution to this is simple: always stabilise your camera.
Use a tripod when capturing stationary shots. When you need to move the camera, use a stabilisation device (such as the C-grip). These will allow you to move your camera without transferring undue amounts of shake to your footage. Remember, your hands move in ways that you are not conscious of, and it is important to counter such movement to ensure you capture high-quality, usable material.
Moving a camera and capturing usable footage is difficult but it can be done using relatively inexpensive equipment and a lot of practice and patience. Rather than planning complicated camera moves during the early stages of your filmmaking career, you will be better served if you focus your energies elsewhere. Practice creating really stable, well-composed shots which can communicate your ideas as well as any movement of the camera. Remember, cutting from a well-composed wide shot to a considered and intimate close-up can be just as effective as moving the camera towards your subject. If in doubt, keep your camera stationary. Practice and experience will allow you to begin experimenting with moving your camera in due course.
Focus your Camera on your Subject
Whether you are using an expensive DSLR or the camera on your smartphone, always focus on your subject. In the case of a human being, focus on their eye — there is no point in focusing on someone’s nose when the eye is the window to the soul. Unfocused shots can remind an audience that they are watching a film, breaking the immersion of the movement, and destroy the aesthetic quality you sought to create with your composition. A distracted audience is a disengaged audience; your viewers demand (even if they are not conscious of it) well-focused shots.
Remember, every time you move your camera (or when a subject moves within your frame) you will need to refocus it. If you are moving your camera, or if you are photographing a moving subject, refocus your shot for every new take. In the case of smartphone cameras and modern DSLRs this can be as simple as touching a point on the screen. There is nothing worse than composing a perfectly stable shot only to find that your point of interest is out of focus when you review your footage at a later date. Otherwise usable footage will be rendered unusable by such an oversight.
After focusing, particularly when using lightweight equipment, such as a DSLR or smartphone, give your camera a moment to rest so that any residual motion, transferred from you to the equipment, has had an opportunity to dissipate.
Compose your Shots
Stability and focus make a shot bearable — shot composition is what makes it worthwhile. It does not matter if you’re shooting on a $10,000 camera or a comparatively inexpensive smartphone, careful and considered composition adds aesthetic value and, if used correctly, intellectual beauty to your work. Even a shot compromised by poor technology can be beautiful and emotive if time has been spent to compose it with care.
Obviously, there are instances when shot composition is not as important as it otherwise might be. The footage of planes flying into the Twin Towers on 9/11 videos are made no weaker by the lack of thought placed into their composition. But unless an event is fundamentally extraordinary, unusual, or dramatic (or there is an obvious reason for an audience to forgive poor composition), poorly-composed shots are not likely to be as effective as they otherwise could be.
To compose effective shots, you should utilise the ‘rule of thirds’. The human eye does not find images in which a subject is placed directly at their centre to be consistently satisfying. Instead, the eye appreciates an image that is imbalanced in some way. The ‘rule of thirds’ is, contrary to its name, a piece of compositional guidance rather than a definitive law which must be followed at all costs.1 There are many pieces of visual art that do not conform to this grid and which would not have been improved by its use.2 That being said, its use throughout the history of film has created a learned appreciation for it among modern audiences. To use the rule of thirds is to appeal to the subconscious expectations of one’s audience. Mentally project the ‘rule of thirds’ grid over practically any film and see how the filmmaker uses the 1/3 axes, both horizontal and vertical, to compose their images. This consistency of approach means that most audiences associate such compositions with high-quality productions. Such compositions, in other words, feel right.
This is how it works: divide your viewing area into thirds, both horizontally and vertically, as seen in Figure 15 This will create a grid: memorise it and see it everywhere you look. Project it onto the world around you. Now impose that grid over a photograph, as seen in Figure 16 Whilst there is nothing egregiously offensive with the photograph in Figure 16, it is not particularly cinematic. The subject is centred, presented in a non-dynamic and uninteresting way. By using the ‘rule of thirds’ instead, that same subject can be framed in a more visually dynamic way.
The ‘rule of thirds’ allows you to present your subjects with implied tension in the composition. The eye prefers images that are not balanced, unless that balance serves a deeper aesthetic, intellectual, or symbolic purpose. Experiment by photographing people or other subjects whilst employing this principle.

Fig. 15. The ‘Rule of Thirds’ grid is frequently used to shape filmic compositions.
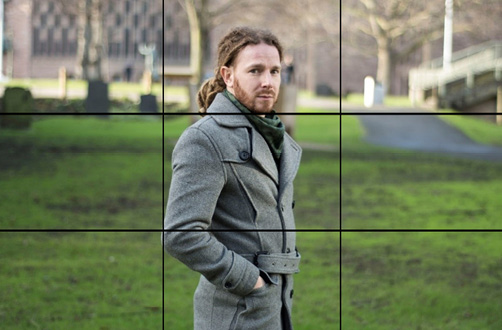
Fig. 16. This photograph makes little use of the grid, its subject having been centred without regard for the ways in which the axes of the grid might add tension to the frame.
The image below (Figure 17) utilises the ‘rule of thirds’ and, as a result, implies a relationship between the subject and their surroundings that was not previously present in the original photograph (see Figure 16). The substantial space to the side of the subject provides them with space into which they can look or move.
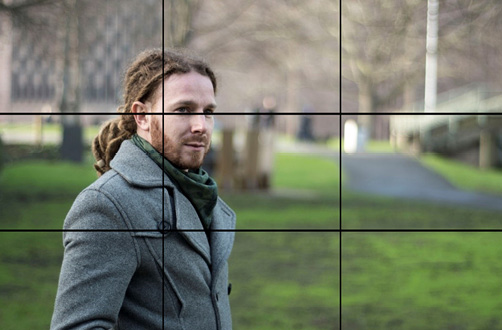
Fig. 17. By moving the subject off-centre and lining them up along one of the 1/3 axes, a degree of tension and imbalance is added to this composition. There is now space into which the subject can look and there is a clearer sense of compositional clarity. Even in a still photograph, the viewer is primed to expect the subject to move from left to right, through the vacant space within the frame.
In terms of interviews, a good rule of thumb is to align your subject with the upper intersection of one of your vertical and horizontal axes, as in the following image (see Figure 18). This will help to place your subject in your frame in a way that feels familiar and well-composed to most of your audience.
Once you start experimenting with the rule of thirds, you will find that your compositions begin to develop their own dynamism, feeling more deliberate and effective in their composition. Of course, there are times when this rule can and should be broken, but learning and understanding the rule will help you to do so effectively. Again, practice is the key to getting the most out of this technique. Next time you photograph a person or scene, line up different elements in your shot with the ‘rule of third’ axes and experiment with the results.
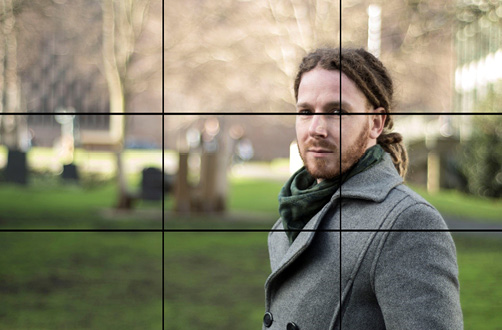
Fig. 18. For interviews, try lining up one of your subject’s eyes with one of the intersections of the upper axes, as seen in this image.
Plan to Capture Contextual Footage
In his mammoth fourteen-part film series on the history of film, The Story of Film (2014), Mark Cousins places a huge amount of material, which might normally be considered B-Roll, front and centre.3 Despite employing a wide range of interviews, Cousins populates much of his series with footage of urban environments (typically related to the locales he is discussing), shot from numerous angles and cut in a way that allows the sequence of images to reflect the themes in his commentary. In so doing, Cousins shows how footage of physical spaces can speak to deeper themes being discussed in documentaries. What might have comprised only a fraction of the shooting time in a traditional TV-style documentary instead has attention lavished on it.
Everything you shoot has the potential to define your film. Do not assume that any of your footage will prove to be of lesser value to you. Interviews and other set-piece moments are naturally going to be important, but carefully photographing the environment and other incidental pieces of footage (B-Roll) can open up significant options once you enter the post-production process.4 Indeed, B-Roll hardly feels like an appropriate label, considering how flexible this footage is, and how centrally it can be used. For the purposes of this discussion, the phrase B-Roll will not be used again. Instead, it will be referred to using a less pejorative label: contextual footage.
As much attention should be paid to capturing contextual footage as is paid to filming interviews or other important set pieces. Interviews may very well be the foundation of your film, but you will likely need at least some shots of your subjects’ context to serve as connective tissue. Contextual footage can help to place your interviewees in an environment that reflects or contrasts with their spoken ideology. In other words, the ways in which you place (or do not place) your subject into context helps to inform how your film is read and understood by its audience.
For example, in a documentary about the history of law, you might shoot footage of your interview subject standing in the entrance of a courthouse. If you shoot wide (at a distance from your subject) you can frame them so that they are dwarfed by the size of the court, the physical manifestation of the law’s power, about which they are an expert. In order to capture the scale and scope of the court (and what it represents), you would probably have to pull your camera so far back that your subject would become lost in the resultant frame. Thus, in order to make this shot work, it would have to be a part of a sequence: a wide shot could give way to a mid-shot in which the subject is somewhat more identifiable. A third shot could then move closer still to the subject; the camera would now be close enough that the audience can clearly identify the subject. The film could then cut to the subject, sat on a chair indoors. In this example, the subject has been placed in context, dwarfed by the institution in which they serve. The resultant mid and close shots ensure that the audience is aware that they are viewing a subject, indiscernible in the first shot, in the context of their surroundings and life’s work.
Alternatively, that same footage could be sequenced in reverse. The interview might have a cold start (no lead-in footage) but, as the interview nears its conclusion the film would then begin to (literally and symbolically) move away from the subject. In this example, the sequence of shots would be: the subject being interviewed; the subject in the door of the courthouse (close up); the subject in the door of the courthouse (mid shot); the courthouse (wide shot). In this sequence, the camera (and thus the audience) moves away from the subject — clarity gives way to obscurity, rather than the move towards greater intimacy with the subject implied by the original assembly. The same footage, assembled differently, can thus provide a substantially different meaning — contextual footage, in both instances, plays a key role in achieving either effect. With sufficient contextual footage, numerous opportunities, many previously unimagined, emerge in the post-production phase. Without that material, the potential to experiment with the assembly of the film is substantially reduced, if not eliminated entirely. By documenting the subject’s context (and the subject in context), you will greatly broaden the size of your visual alphabet.
You might also construct visual montages from contextual footage that echo or rhyme with interview dialogue (or commentary tracks). In a film about homelessness, for instance, an anecdote about life on the streets during the winter months might be illustrated with a visual sequence showing shots of a city, shot low (the vantage point of someone sitting or lying down on the pavement) to create a type of accompanying visual essay: pools of stagnant, freezing water; feet and legs passing in front of the camera; small groups of affluent young people chatting convivially, happily soaking in their surroundings, shot from a distance. Depending on how you photograph this contextual footage, and the order in which you sequence it, it will take on any number of different meanings which will add intellectual and aesthetic depth to your work.5
There is significant creative and intellectual value in treating your contextual footage with as much weight as you treat your A-Roll. By paying attention to one’s environment and endeavouring to film it in a way that captures its vibrancy and contradictions, new themes can be brought out and discourses deepened. Achieving this, however, will require you to make a concerted effort to document spaces as much as you document people or events. Consider both practical and symbolic uses for the environmental footage. Practically speaking, such footage can lead into and out of interviews, or provide a visual cue over which a commentary track can run. But symbolically, a space can serve a much deeper purpose when it is photographed and explored on screen. The example of the law historian in front of the courthouse merely touches upon that potential.
Contextual footage can tell a story about a space, creating new truths that speak to the themes and subtexts linked to, or at odds with, those explored explicitly in your film. A sequence of shots, moving towards, away from, or about a space can help to create an effective narrative or thematic frame. Each shot of the environment, each cut, should serve to develop that frame, bringing out the specific details of the narrative or topic. This might be accomplished by gradually positioning the camera closer to a building, as in our earlier example, bringing the audience closer to a subject or some symbolic detail in the environment. Or the camera might move in a less organic way, cutting from one detail to another without particular attention being paid to how the shots relate to each other spatially. In the courthouse example, this might mean cutting between different details carved into the building’s facade. On a medieval church, such shots might focus on the religious iconography carved into the structure, gargoyles and stained-glass motifs.6
Capturing copious and considered contextual footage alongside your A-Roll will provide you with many options when it comes to your film’s assembly, but there is a vast array of precedent that will help to inspire the possibilities open to you; examples that you can follow, discard, build upon, and react against. Consider, for instance, the opening of Woody Allen’s 1979 dramatic film, Manhattan, in which shots of Manhattan Island are cut together to the lackadaisical opening of George Gershwin’s ‘Rhapsody in Blue’. The sequence is comprised entirely of contextual footage and functions as a type of short film in its own right, a little poem about life in the bustling heart of New York. The sequence is remarkably effective considering the relative simplicity of its component parts — contextual footage, a piece of music, and an audio commentary. Whilst documentarians may not see value in emulating Allen, there is much they can learn by studying and reacting to this sequence.7
Shoot Longer Takes
As an example, assume that you need a thirty-second shot of a building’s exterior. You set up your camera on a tripod, focus it on the front the building, and press record. How long shout you leave your equipment recording?
Obviously, thirty seconds is the bare minimum duration for such a shot, but, ideally, you should leave your equipment to record for quite a bit longer. Contact with your hand (when you hit record) may start the camera shaking slightly and it may take several seconds for the camera to become entirely stabile again. Perhaps more importantly, you may come to realise during the editing process that what you actually needed was forty-five or sixty seconds of footage. The solution is to take longer shots as a matter of course, ensuring you have maximum flexibility during the editing process.
Do not capture footage that only meets your minimum spec. As a rule of thumb: double what you need and then add a fifteen-second ‘leader’ at the start (to compensate for any camera shake). Thus, if you need thirty seconds, shoot for 1:15 (15 seconds, plus 30 x 2). This should ensure that there is at least thirty seconds of usable footage. If time is not a factor, quadruple your minimum requirement and add fifteen seconds.
In many, probably most, cases, however, you will not know how much footage you actually require. There is no simple rule of thumb should you begin filming a shot that you had not previously anticipated, but you should endeavour to capture enough footage to ensure that your footage can be used in a wide range of ways during the editing process. Ten to fifteen seconds might feel like a more than adequate amount of footage when you are in the field, but during the editing process it will severely limit your options. One minute and thirty seconds might feel like an excessive amount of time to record, for example, a building’s exterior, but such a long shot will give you many possibilities that a shorter shot would not.
If you find an interesting scene, set up your equipment and begin recording. If something is unfolding, capture the entirety of that event — and then keep recording. You might not realise it at the time, but the camera may capture an interesting after-effect. If you are shooting a car, perhaps it will lift some leaves into the air; off-site, you may realise that it is the shot of the leaves blowing in the car’s wake that is the most visually or symbolically dynamic part of the footage you captured. This may not have been evident to you when you captured the footage in the field.
In other words: shoot more than you require. Never shoot the bare minimum.
Take Control of your Camera’s Settings
Whether you are using a smartphone or a DSLR or a pro-camcorder, your equipment will provide you with at least some control over its operations. It can be tempting, particularly for first-time filmmakers, to simply set their camera on automatic. Doing so, however, means that you will forgo a significant amount of control. It might also result in footage that, for one reason or another, does not conform to how most people expect modern cinematic footage to look or feel (see chapter nine).
As a rule of thumb, you should film at twenty-four frames per second (fps). This is the frame rate at which most films are shot and, as a result, feels correct. A century of cinema has conditioned us to expect a certain look from movie footage. Consider the negative reaction surrounding the 48fps (high frame rate) release of Peter Jackson’s The Hobbit (2012–2014) trilogy. Despite costing hundreds of millions of dollars, critics complained that the frame rate, whilst smooth, made the film look and feel cheap.8 What they meant was that the increased smoothness of the frame rate made the film feel un-cinematic. It was too realistic and, as a result, audiences were disturbed and taken out of the moment — they found it more difficult to suspend their disbelief. A frame rate of 24fps will help to provide a subtle cinematic feel to your film. It will almost certainly not be noticed or appreciated by your audience, but its absence might.
If you are using a DSLR there are a number of other settings that will allow you to capture footage that feels even more cinematic — see chapter nine for a complete breakdown of how to set up your camera.
If you are using a smartphone or tablet, there are a number of apps that will allow you to gain greater control over your camera’s settings. Currently, FILMiC PRO offers iOS and Android users the ability to change the camera’s frame rate and method of recording sound, whilst introducing separate controls for focus and exposure. These features will empower you to capture higher-quality footage. The use of manual control is, of course, more time- and labour-intensive, but the results easily negate this.
1 For an early, pre-photographic description of the rule, see John Thomas Smith, Remarks on Rural Scenery (London: Nathaniel Smith, 1797), pp. 15–17.
2 Bert Krages, Photography: The Art of Composition (New York: Allworth Press, 2005).
3 The Story of Film: An Odyssey. Directed by Mark Cousins. Edinburgh: Hopscotch Films, 2011.
4 The Story of Film: An Odyssey. Directed by Mark Cousins. Edinburgh: Hopscotch Films, 2011.
5 Dancyger, The Technique of Film and Video Editing, pp. 16–22.
6 Los Angeles Plays Itself, by Thom Andersen, is a masterclass in its own right on the use of contextual footage in order to tell the story of a space. See Los Angeles Plays Itself. Directed by Thom Andersen. New York: The Cinema Guild, 2004.
7 Manhattan. Directed by Woody Allen. Los Angeles: United Artists, 1979.
8 For examples, see Jen Yamato, ‘The Science of High Frame Rates, Or: Why “The Hobbit” Looks Bad at 48FPS’, Movieline, 14 December 2012, http://movieline.com/2012/12/14/hobbit-high-frame-rate-science-48-frames-per-second; Vincent Laforet, ‘The Hobbit: An Unexpected Masterclass in Why 48FPS Fails’, Gizmondo, 19 December 2012, https://gizmodo.com/5969817/the-hobbit-an-unexpected-masterclass-in-why-48-fps-fails; Anthony Wong Kosner, ‘The Reason Why Many Found The Hobbit an Unexpectedly Painful Journey’, Forbes, 11 January 2013, https://www.forbes.com/sites/anthonykosner/2013/01/11/the-reason-why-many-found-the-hobbit-at-48-fps-an-unexpectedly-painful-journey/#6f2143ba31cf. For alternative perspectives, see Hugh Hart, ‘The Hobbit is Insanely Gorgeous at 48 Frames Per Second’, Wired, 12 December 2012, https://www.wired.com/2012/12/hobbit-movie-review-48-fps/ and Jacob Kastrenakes, ‘The Hobbit’s Vision for the Future of Cinema Looks Awful, but it Might Just Work’, The Verge, 19 December 2014, https://www.theverge.com/2014/12/19/7422633/hfr-might-work-even-though-it-looks-really-awful