9. Settings, Lenses, Focus, and Exposure
© 2021 Darren R. Reid and Brett Sanders, CC BY-NC 4.0 https://doi.org/10.11647/OBP.0255.09
There are a number of settings and features on your camera with which you should familiarise yourself. As much as possible, you should move away from the automatic mode on your camera and begin setting it up to accommodate the conditions in which you find yourself. As much as possible, this chapter will continue to provide practical, actionable information. There is much more to be said about lenses and how they function, but that information is not required in order to utilise your lenses effectively. Remember, there is much that can be learned beyond this text about these topics, but the information here should prove sufficient to facilitate a quick and effective transition into the field.
This chapter will provide you with the knowledge needed to quickly begin utilising your camera to its best potential. The first section contains the standard camera settings that you should use in order to capture footage that feels analogous to film (cinematic). The second, third, and fourth sections build upon this by providing information and techniques that will allow you to begin to stylise the footage you capture.
Camera Settings
If your camera has the option, you should adjust the following settings as closely as possible to the following specifications.
- You should set your frame rate to 24fps.
This is the standard frame rate that is most closely associated with the look and feel of celluloid. A lower frame rate can give your video a choppy feel which will likely make your audience feel uncomfortable. More than this and an image can become too smooth and will start to feel like the cheap video on which television shows were frequently shot in the 1980s and 1990s. There are, of course, exceptions. If you have a camera capable of shooting at, say, 60fps, then you will be able to slow down your footage to a fraction of its normal playback speed, capturing super-smooth slow-motion footage. As a rule, you should only shoot at 60 or 120fps (etc) when you want to capture such slow-motion sequences.
- Your shutter speed should be 1/frame rate x 2.
This is only applicable if you have a camera that allows you to control your shutter speed (such as a DSLR). If you do, apply the above formula as closely as possible. If you are shooting at 24fps, your shutter speed should be 1/48 (1/24x2) — or as close to that as your camera allows (1/50 is a common setting on most DSLRs). If you are shooting at a high frame rate for slow-motion shots, such as 60fps, the shutter speed becomes 1/60x2 — or 1/128.
- White balance can be used to change the hue of your footage. Essentially, this controls the ‘temperature’ of your image. A low temperature gives your image a blue tint, and a warm temperature gives it a yellow tint.
For everyday shooting, setting your white balance to automatic should be sufficient. But if you wish to give your footage a specific look, experiment with the different settings on your camera. Your camera, if it allows for white balance control, is likely to contain settings for different locales — for instance, there is likely to be a white balance pre-set for shooting under florescent light, a pre-set for shooting in cloudy conditions, and a pre-set for shooting in bright sunlight. To stylise your footage, try using a white balance pre-set that it is not intended for the conditions in which you find yourself.1
Alternatively, shoot using the appropriate pre-set and then colour-grade your footage in post-production to give it the desired effect. Approaching the stylisation process in this way means that a neutral version of your original footage, should you ever need it, will be available to you. If you are shooting using more than one camera, pay particular attention to the white balance on both cameras to ensure that they are capturing footage that is comparable. Particularly when using cameras by different manufacturers, it may be necessary to set the white balance on both cameras manually to ensure a consistent temperature profile between your shots.
Lenses
It is important that you understand some basic rules about how lenses work. Even if you are using a fixed-lens camera or a smartphone, you should have some grasp of how lenses capture footage in the way that they do, to ensure that you can anticipate how your equipment will perform in different situations and conditions.
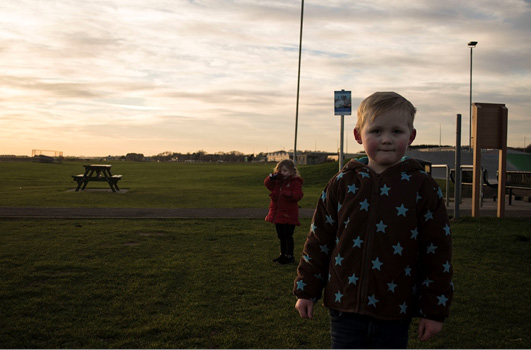
Fig. 20. Two subjects standing approximately eight feet apart, photographed using an 18mm lens. Note how small many of the background details are. All rights reserved.
The focal length of your lens is measured in mm — the smaller the number, the wider the shot. An 18mm lens would capture a wide view (zoomed out) of a scene, whereas a 200mm lens, looking at the same area, would instead capture a close-up (zoomed in).
Aside from zooming in, however, the focal length of your lenses also affects the type of image that your camera captures, particularly with regard to how close background and foreground objects appear in relation to one another. A lens with a small focal length will preserve the sense of distance between the foreground and background, whereas a lens with a longer focal length will compress (squash) the distance between them. Consider Figures 20, 21, and 22. The subjects remain stationary; only the lenses have been changed. Note how the spaces between the two subjects is compressed, as the focal length increases.
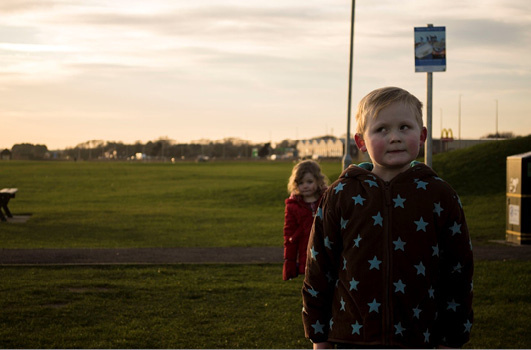
Fig. 21. The same two subjects, standing in the same positions, photographed using a 50mm lens. Note how the background subject now appears much closer to the foreground subject. Note also how the background details have increased in size. All rights reserved.
In Figure 20 the two subjects have been photographed using a lens with a focal length of just 18mm. In this image, the foreground subject is significantly larger than the background subject. In Figure 21 the same two subjects were photographed standing in the same locations, but using a lens with a 50mm focal length. In this image, the background subject seems to be much closer to their counterpart in the foreground when, in reality, they have remained stationary. In Figure 22, which was shot on a lens with a focal length of 200mm, the background and foreground subjects appear to be almost the same size. By changing the type of lens being used to capture this scene, the resultant compositions produce radically different effects.
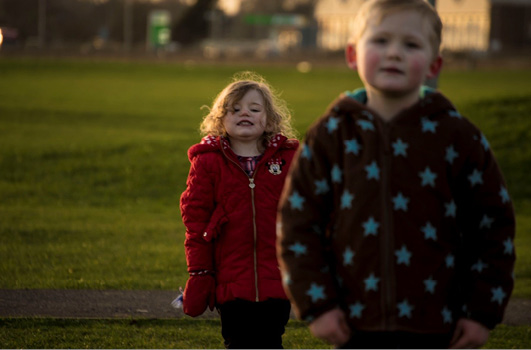
Fig. 22. When photographed in 200mm, the background subject (upon whom the focus has now been pulled) appears very close to the foreground subject. Also note how close the environmental background details appear relative to our subjects. The space in this frame has been severely compressed. All rights reserved.
A lens with a large focal length compresses the distance between objects in the foreground and background of your footage. This means that, aside from zooming into a scene, a 200mm lens will bring distant background objects much closer to the foreground. Compare the backgrounds of Figures 20 and 22. Note that in Figure 20, there are buildings in the distance but they appear very small in this composition. In Figure 22 on the other hand, the same buildings now appear much larger. This creates the impression of compressed space.
Lenses with a small focal length can also distort facial features, adding subtle (and sometimes not-so-subtle) distortion and bulge. In contrast, a lens with a larger focal length, say 200mm, will tend to flatten facial features. A lens of about 50mm captures images that produce a reasonable approximation of what is seen by the human eye.
Stylised Focus
You should experiment with focal lengths to create more beautiful or symbolically rich imagery. Shallow focus, where only a part of the shot is in focus, often produces aesthetically beautiful shots which serve to direct the viewer’s attention to a specific location within a frame. If a person is filmed in shallow focus, the background around them will typically be so indistinct that the viewer will have no choice but to direct their attention fully towards the subject. In contrast, a deep-focus shot, one in which every part of the frame is clear and discernible, can more effectively place a subject in context.
To achieve shallow focus, you will generally need a lens with a large aperture. The aperture is the hole through which light enters the camera. The wider the aperture, the shallower the focus. The aperture size is measured in f-stops. The lower the f-stop, the larger the aperture and vice versa. An f-stop of 1.4 would allow a lot of light into your camera, but would give you very shallow focus. An f-stop of 3.5 will give you a shot in which most, but not all, of the frame is in focus. An f-stop of 8 will let in a comparatively small amount of light, creating a frame in which much of the detail will be sharp and clear. Most consumer cameras, and the kit lenses that come with most DSLRs, have a reasonably large f-stop, enough that some areas of a shot will be out of focus, but not large enough that you will be able to achieve a highly stylised, shallow-focus look. To achieve this, you should supplement your camera with a lens which possesses an f-stop of 2.8 or 1.8.
For filmmaker-scholars, functionality must trump style; it is important that a transient moment is captured in a usable form. Visual beauty is desirable, but not essential. A shallow focus might help to stylise your footage, but the effort and time required to adjust your focus might result in your failing to capture a significant, but transient moment — and it is better to capture imperfect footage of a rare event than beautiful footage of something inconsequential. Stylised footage can look beautiful — but it can also distract and is generally more time-consuming to achieve. It should be employed with care and consideration.
Many types of digital cameras will not allow for the capture of a particularly shallow focus, but there are ways to force a limited version of the effect. One way to force a shallow effect (particularly on smartphones) is to shoot a scene with a foreground object that is much closer to your camera than the main subject of your frame. For example: place your camera on the ground, a few inches away from a blade of grass. Focus it upon your subject (which should be some distance from the camera), and the blade of grass will blur. The result will be an image in which your subject is in focus, but an out-of-focus foreground object adds some stylisation to the shot. Conversely, the same setup would allow you to focus on the foreground object (in this example, a blade of grass), forcing the background to blur. This approach is quite limited, however, and requires you to think carefully about setting up this type of shot for any type of practical application. If shallow-focus stylisation is something you wish to achieve with regularity, a DSLR with an appropriate lens will be a much better long-term solution for your needs.
You should be wary, however, about sacrificing your composition for the sake of some lens blur. Whilst shallow focus, when used correctly, can certainly add value to a production, it can also be distracting if it is used gratuitously. If, when composing a shot, you recognise an opportunity to use shallow focus effectively, then experiment to see what the overall effect will be. But remember — overall shot composition is far more important than adding some lens blur.
Exposure
Exposure is related to focus, thanks to the light-gathering function of the camera’s aperture (f-stop). If a piece of footage is overexposed, parts of your frame will lose detail. ‘Burning out’ occurs when a camera no longer records information in over-lit areas; where there should be detail and a gradation of colours and shade, the camera will instead only record an area of white without detail. Conversely, underexposed footage stops recording detail in the shadows. In under-exposed footage, parts of a frame become black holes with no discernible nuance or structure, in much the same way that over-exposed sections become white splodges with no detail.
There are two main ways to control your exposure — the size of your aperture (f-stop) and your ISO setting. As already mentioned, the smaller the f-stop (and thus, the larger the aperture), the more light is admitted. This allows you to capture footage with a shallow focus, but on a sunny day you might well find that your image is easily over-exposed as a result. To compensate for this, adjust the size of your f-stop. This will reduce the amount of light entering your camera as well as deepening the focus of your shot (this may be an unwanted side-effect if you are hoping to achieve a shallow focus). Alternatively, you can reduce your ISO, adjusting it until the image is no longer over-exposed. In doing so, however, you might reach your camera’s lowest ISO limit (typically 100) but still find that your footage is over-exposed. At this point, you will either need to close up your aperture (and accept that you will not be able to capture a shallow-focus image) or apply a neutral density (ND) filter. These simple devices cut down the amount of light entering the camera, allowing for wider-aperture (lower f-stop) settings to be used in bright or sunny situations. They are typically inexpensive and are widely available. If you intend to capture shallow-focus footage using a DSLR in daylight conditions, an ND filter will be an essential purchase.
For most consumer cameras and smartphones — those without any control of the size of an aperture (f-stop) — exposure will be controlled exclusively via your camera’s ISO settings. If you are using such a camera, you should keep at least one eye on your ISO and be prepared to adjust it if parts of your image are either too bright or too dark.
As a rule, you should keep your ISO as low as possible. Increasing your ISO can introduce ‘noise’ (grain and other visual artefacts) to your footage, reducing its quality. How high you can push your ISO before noticeable amounts of ‘noise’ appears will depend entirely upon your camera. On some cameras, pushing your ISO beyond 800 will result in a marked decrease in the sharpness of your image and the amount of noise that is visible. In other cases, particularly on newer cameras, the ISO can be pushed significantly higher before the footage quality begins to noticeably degrade.
Experimentation is the key to understanding the usable threshold of your camera’s low-light capabilities. As a rule, we try to avoid pushing our equipment beyond an ISO setting of 1600. After this point, the image tends to get noticeably noisy to the point of distraction and footage can become unusable (although some newer DSLRs have significantly improved their low-light capability). It is also worth keeping an eye on your ISO level when you are in well-lit conditions. Try to keep your ISO as low as possible to avoid adding unnecessary noise to your footage.
Problematically, most consumer cameras struggle in low-light conditions. This means that as you increase your ISO level, noise is unavoidably introduced to your footage. The higher your ISO, the more noise enters your shots. This can make footage captured in low-light conditions significantly inferior to the footage you capture in well-lit conditions.
Though frustrating, this a reality to which you can adapt. Smartphones, for instance, tend to have comparatively poor low-light capabilities. Properly stabilised and focused, smartphones can capture quality footage but, in low-light conditions, footage that would otherwise have been clear and impressive can take on a low-resolution look and feel. Sound planning (shoot during the daytime in well-lit conditions) can make a big difference. Plan your shoot so that you avoid, as much as possible, forcing your equipment to work under conditions that will produce poor-quality results. Experiment with your equipment so that you become familiar with its limits, quirks, and capabilities. When shooting, we have repeatedly come up against the low-light issue. In fact, new cameras that can handle low-light conditions are of special interest to filmmakers for this very reason. When making Looking for Charlie we utilised a Nikon D3100 — out of date even when we acquired it, it was, nevertheless, able to capture usable footage. However, its low-light capabilities were very poor and, as light levels faded, so too did the quality of the footage it captured.
It is possible to shoot in low-light conditions, even with humble equipment, but, typically, the results of shooting at night with a cheap or non-specialised consumer camera will be of a poor quality — even when the camera operator understands the quirks and limitations of the technology at their disposal. But, if you happen to find yourself in a position where you have no choice but to shoot in low-light conditions with crude equipment, shoot anyway.
Get your camera out, stabilise it, frame your shot, focus, and start recording. The very worst that can happen is that you get unusable footage — but you might get something that is usable. Do not build your shoot around such endeavours, but if an opportunity presents itself, and there is no other time- or resource penalty for making the attempt, doing so is worthwhile. Even a noisy shot can work in the correct context.
1 See Hugh Fenton, Cinematograph: Learn from a Master, YouTube, 27 April 2012, https://www.youtube.com/watch?v=KwtpJ3T8eK4&t=7s